Defects in Knit Fabrics: Identification, Causes and Quality Control Solutions

28 min read

Knit fabric defects is a common quality problem occurred in knitting, dyeing, finishing or handling processes. Knitted fabrics are produced by interlooping yarns and are therefore more elastic than woven fabrics but also more sensitive to machine settings, yarn quality and process control. Identification and control of knit fabric defects is critical to fabric performance, garment appearance and customer satisfaction.

Defects in Knit Fabrics: Identification, Causes and Quality Control Solutions
Knit fabric Defect

Knitted fabrics are popular for their comfort, elasticity and wide application in fashion. But, since they are made of inter-looped yarns, they are more susceptible to defects than woven fabrics. One fault can affect the structure which may be more obvious after dyeing, washing or finishing. For manufacturers, even minor defects can balloon into major problems, resulting in rejections, claims and broken buyer relationships.

It is very important to know the types of defects, causes of defects and preventive measures which can be applied in each stage from yarn preparation to knitting, dyeing, finishing and inspection to control this risk.

knit fabric defects due to problems in:

Because knitted fabrics are made of inter‑looped yarns, they are more sensitive to defects than woven fabrics. Even a small fault can spread or become more visible after dyeing and washing.

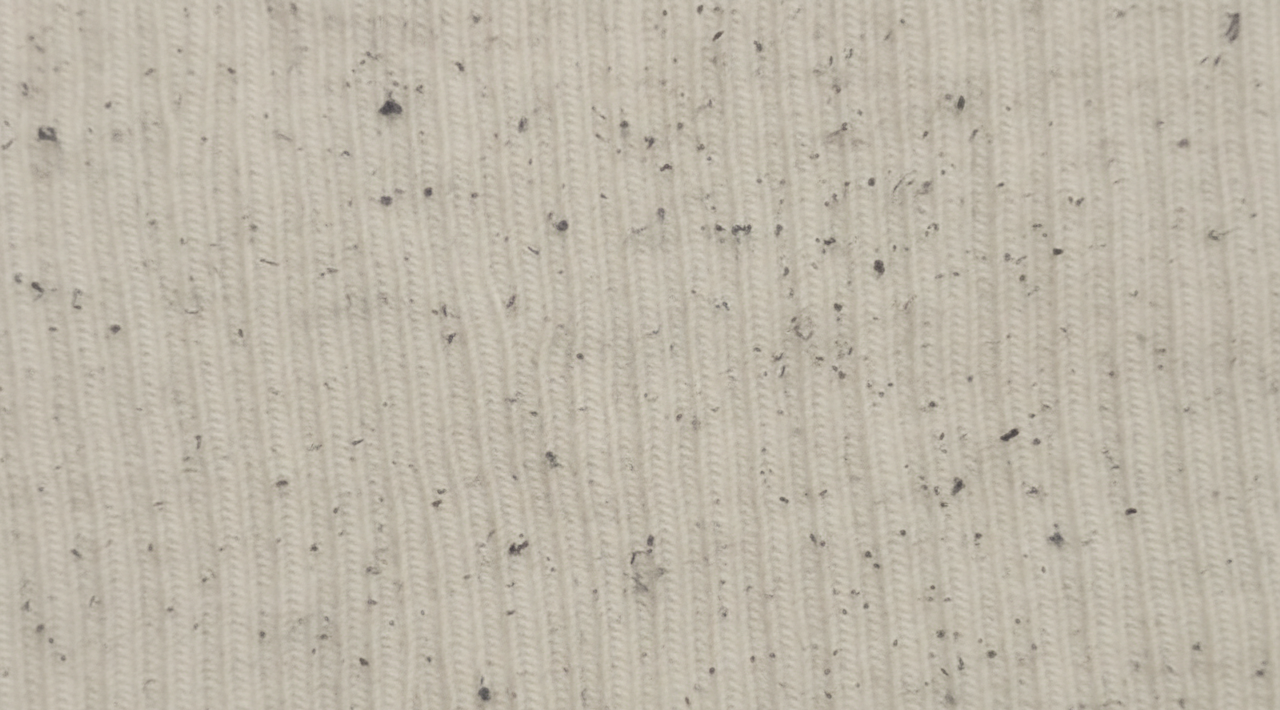
Yarn dust / lint specks

Lint specks are small dark or gray dots scattered over the fabric. They are particularly obvious on light shades, where even tiny specks ruin the clean appearance.
The causes are commonly environmental, viz. fly from spinning or knitting rooms, bad housekeeping or yarns with high hairiness. The effect is a dirty look that buyers just reject, especially in the lighter shades.
Prevention requires a disciplined approach: air filtration, lint extraction at feeders, compact spinning to reduce hairiness and frequent machine cleaning. This means that in practice housekeeping is not only about cleanliness – it is connected to the quality of the product.
Yarn dust / lint specks
  • Looks like: Tiny dark/grey specks scattered (more visible on light shades).
  • Causes: Fly from spinning/knitting room, poor housekeeping, high hairiness.
  • Impact: Dirty appearance, reject risk on pale hues.
  • Prevention: Air filtration, lint extraction at feeders, compact spinning/low hairiness, frequent machine cleaning.

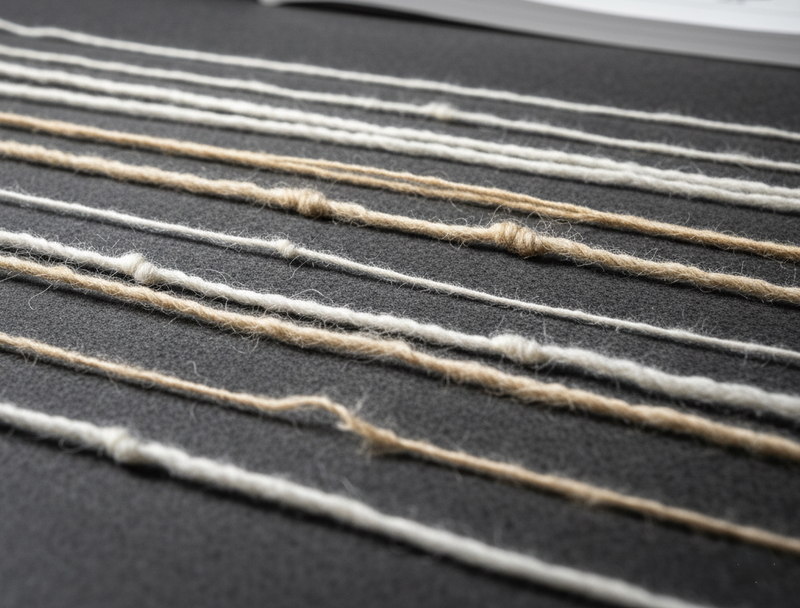
Slubs / thick‑and‑thin / neps
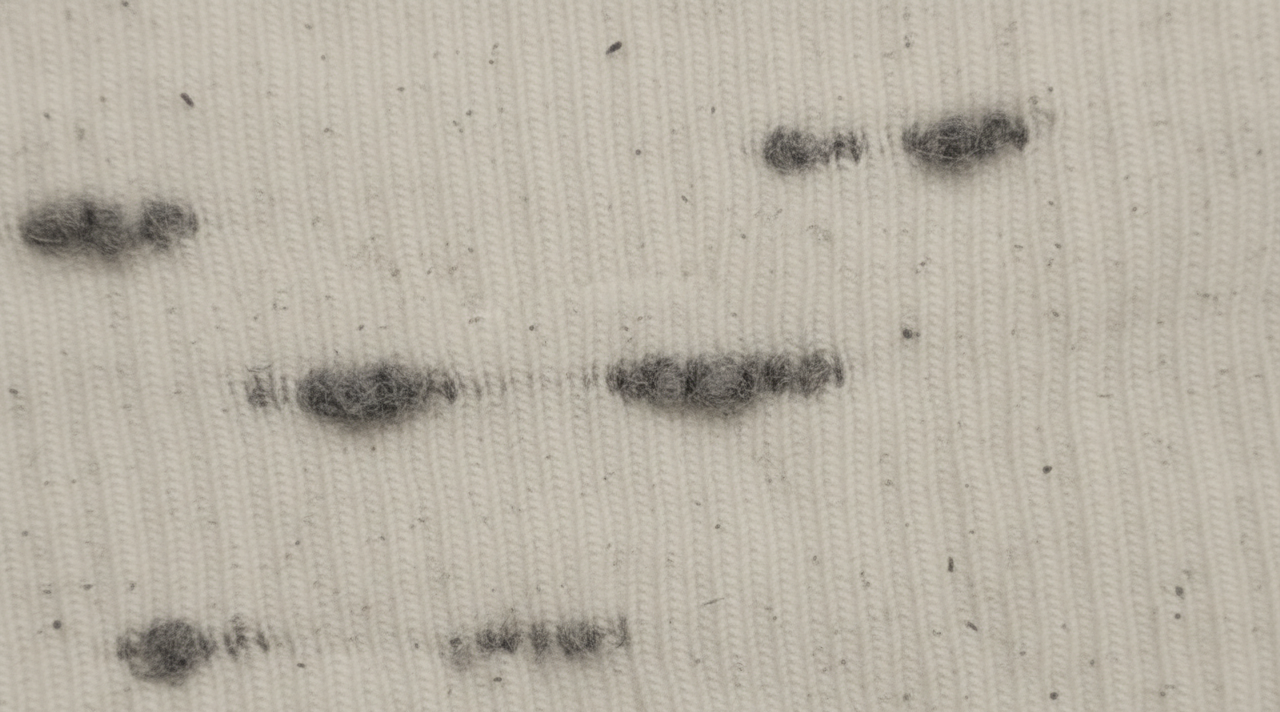
Slubs appear as occasional heavy bars or small knots. They often produce barre effects, horizontal streaks across the fabric, after dyeing.
They are caused by variation in yarn count, faults in carding or combing or deposits in rotor spinning. The effect is uneven shading, streaking and greater chance of pilling during wear of the garment.
To prevent Use Uster testing for evenness control Use autolevellers for consistency Use yarn clearer limits tuned to catch thick places . Supplier quality gating is also critical – bad yarn quality at the source cannot be corrected later.

Slubs - thick‑and‑thin - neps
  • Looks like: Intermittent thick bars or small knots; barre after dyeing.
  • Causes: Count variation, carding/combing faults, rotor deposits.
  • Impact: Streaks, uneven shade, pilling risk.
  • Prevention: Yarn evenness control (Uster), autoleveller, yarn clearer limits tuned, supplier gating.

Foreign fibre contamination (PP, dyed fibers, seed coat)
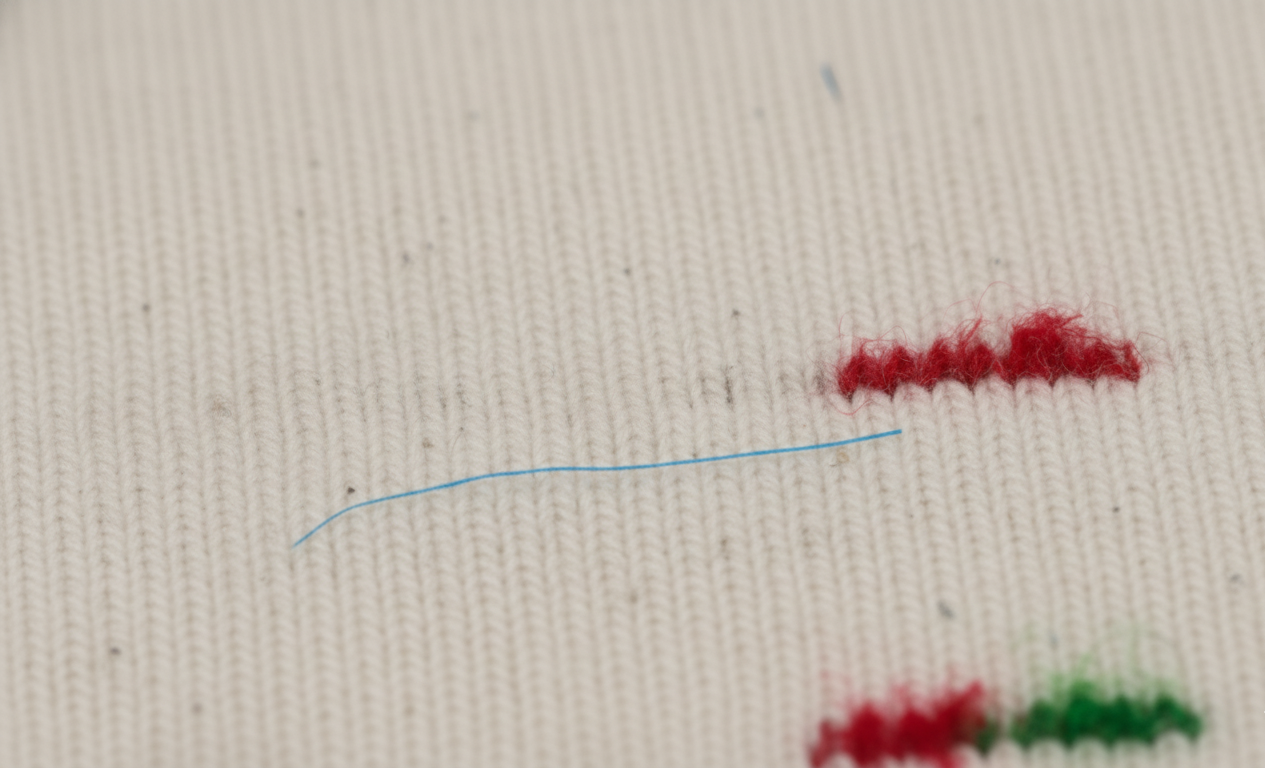
Colored or white specks embedded in the fabric are foreign fibers such as polypropylene, dyed fibers or seed coat fragments. This gives a "peppery" appearance and is not allowed in whites and pastel colors.
Reasons include contamination of cotton, incorrect packaging materials or mixing of bales. The impact is severe. If dyeing reveals spot defects you have buyer claims and reputation damage.
Prevention implies cotton sorting, vision systems to detect contaminants, yarn clearer detectors and strict floor discipline e.g. no black bags giving off fibres.
Foreign fibre contamination

  • Looks like: Colored or white fibers embedded; “peppery” look.
  • Causes: Contaminated cotton, packing materials, bale mix.
  • Impact: Spot defects after dyeing; buyer claims in whites/pastels.
  • Prevention: Cotton sorting, vision systems, yarn clearer FF detectors, black‑bag ban on floor.

Oil/grease stain 

After dyeing, oil stains appear as discrete dark patches or halos. They arise from leaks in the lubrication, dirty ring frames or careless handling of the cones.
The effect is a visible stain which destroys the appearance of the fabric and results in rejection. Prevention includes preventive maintenance, food-grade knitting oil, clean trolleys and quarantining stained packages before they reach production.
Oil/grease stain
Oil/grease stain
  • Looks like: Local dark patches; halos post‑dye.
  • Causes: Lube leaks, dirty ring frames, cone handling.
  • Prevention: Preventive maintenance (PM), food‑grade knitting oil, clean trolleys; quarantine stained packages.

Elastane (Lycra) faults
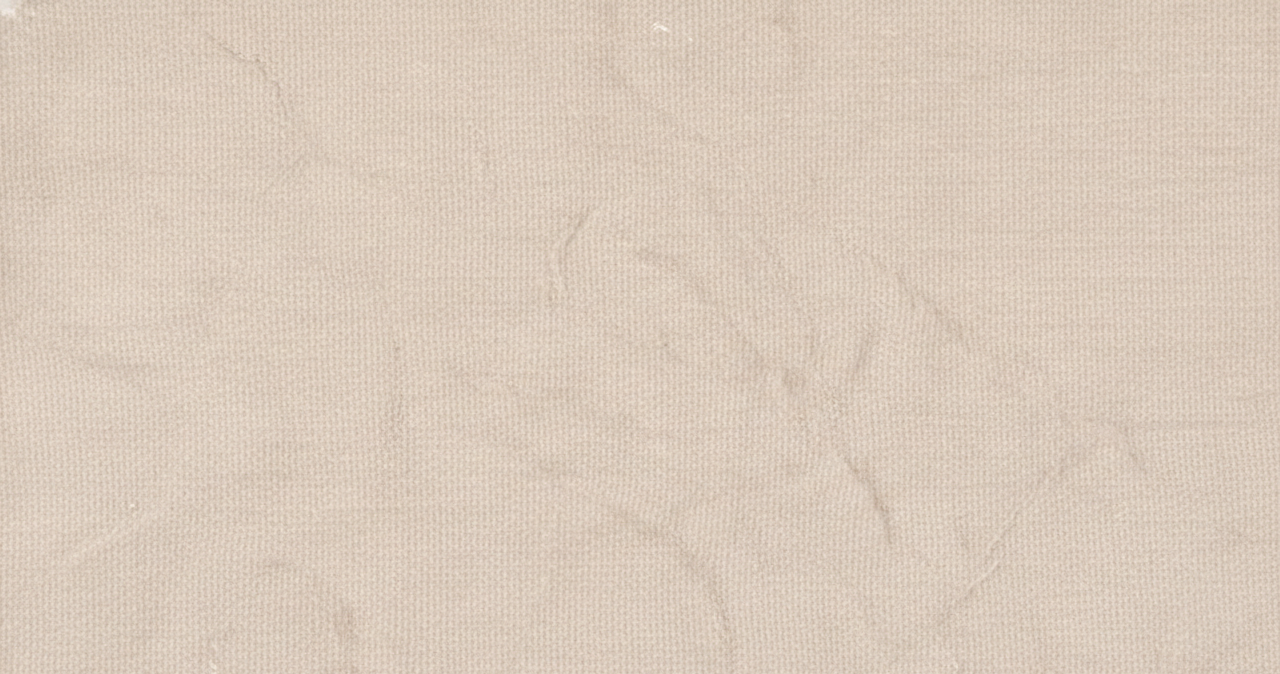
Elastane defects Missing Lycra (no stretch bands) Exposed Lycra on fabric face Uneven overfeed/underfeed bands
Causes can be broken elastane yarns, feeder slip, wrong draft percentages, friction in the yarn path. The result is stripe bands, growth problems and uneven recovery on fabrics.
Prevention has to be combined with quality checks, constant overfeed control, clean ceramic guides, tension closed loop systems and elastane quality tests for tenacity and elongation.
Elastane (Lycra®) faults
Elastane faults
  • Types: Lycra missing (no stretch bands), Lycra out (exposed on face), overfeed/underfeed bands.
  • Causes: Broken elastane, feeder slippage, wrong draft/overfeed %, yarn path friction.
  • Impact: Stripe bands, growth issues, uneven recovery.
  • Prevention: Interlacing quality, constant overfeed (±1%), clean ceramic guides, tension closed‑loop, elastane quality check (tenacity/elongation).
Knitting‑Stage Defects

Among the most critical are the knitting stage defects, because they directly affect the structure of the fabric. Structural knitting problems, unlike surface stains or dyeing issues that can sometimes be corrected later, are often permanent and can affect the strength, durability and appearance of garments.

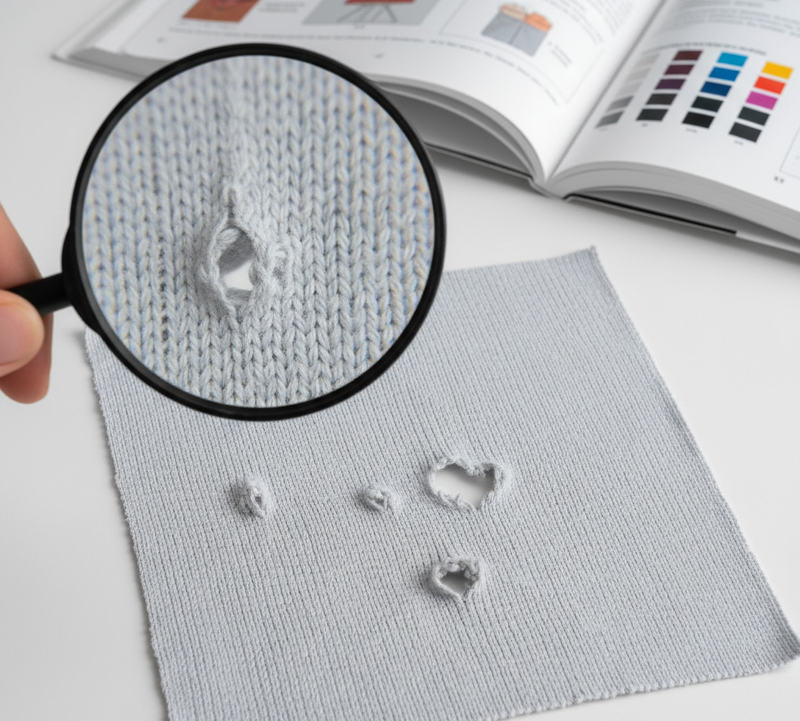
Holes
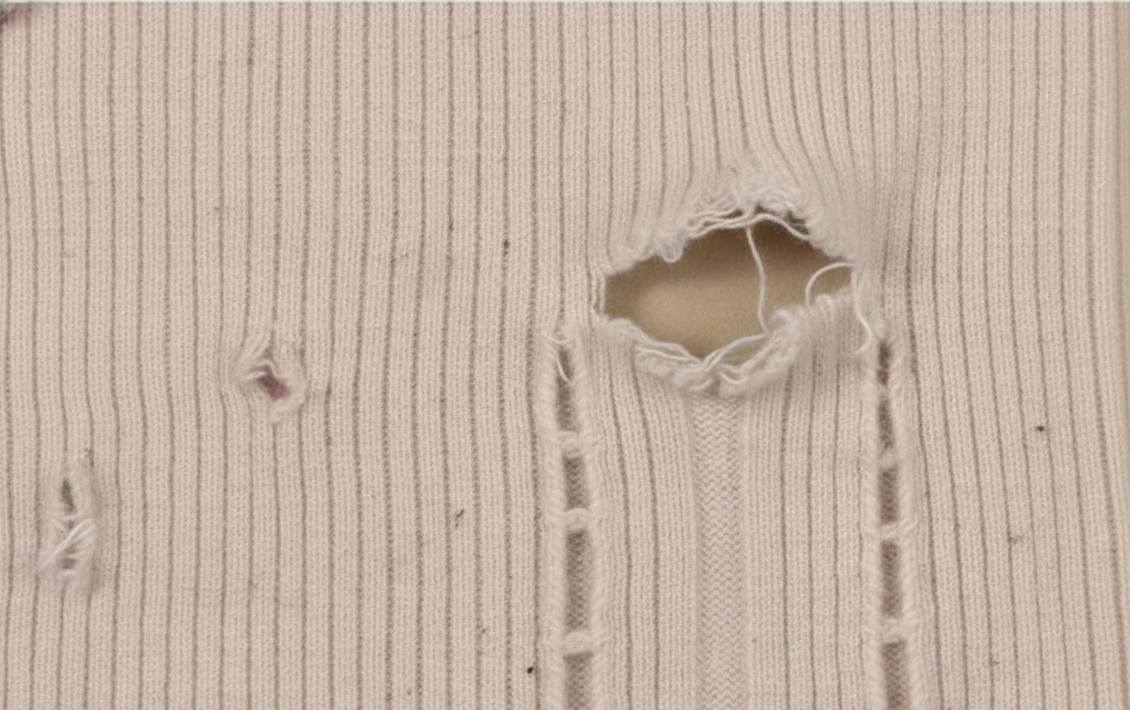
Holes can be anything from small pinholes to large gaps, often with ladders or runs. They result from broken or missing needles, sharp sinkers, fabric take-down spikes, or hard knots in the yarn.
The impact is serious, as holes are zero-tolerance defects. Even one hole can mean fabric rejection, since it can’t be fixed without leaving marks. In garments, holes compromise the structure and make visible flaws that customers will not tolerate.
Strict audits of needles are necessary for prevention, needles should be inspected for wear and replaced regularly. Knot quality must be controlled with limits such as ≤3 knots per 1000 meters. Tension alarms and yarn clearer stop marks should be used to detect the faults at once. In practice, this means operators have to be alert and active, and turn off the machines as soon as a hole is found.

Holes
Holes
  • Looks like: Pinholes to large holes; often with ladder (run).
  • Causes: Broken/missing needles, sharp sinkers, fabric take‑down spike, hard knots.
  • Prevention: Needle audit per hours, knot quality (≤3 knots/1000 m), tension alarms, yarn fault clearer stop‑marks allowed but controlled.

Drop stitch / ladder /Run
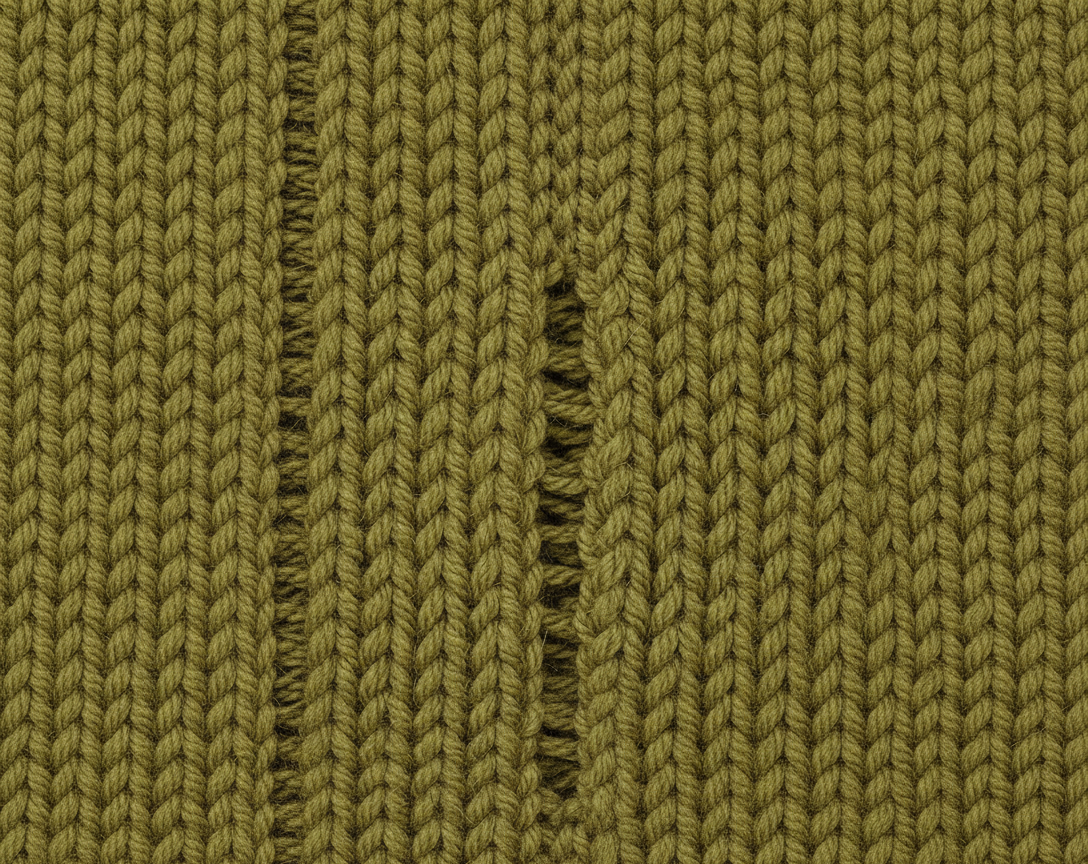
Dropped stitches appear as vertical lines of missed loops, often creating ladders or runs. They are from missed clearing height, worn needle hooks, high tension with low loop length, or selector mis-hits.

The effect: structural weakness. A ladder can spread rapidly across the fabric, so it is not appropriate for garments. Even small drop stitches are visible after finishing and diminish the durability of the fabric.

Prevention involves proper clearing height, replacement of worn parts, stabilization of loop length and calibration of selectors. In many factories, CV% of loop length (target <1.5) is monitored to ensure consistency. Operators also need training to identify early signs of drop stitches before they spread.

Drop stitch / ladder / run
  • Looks like: Vertical line of missed loops.
  • Causes: Missed clearing height, worn needle hook, low loop length with high tension, selector mis‑hit.
  • Prevention: Set clearing height, replace worn parts, stabilize loop length (CV% < 1.5), selector calibration.

Set‑up mark / start‑up crease
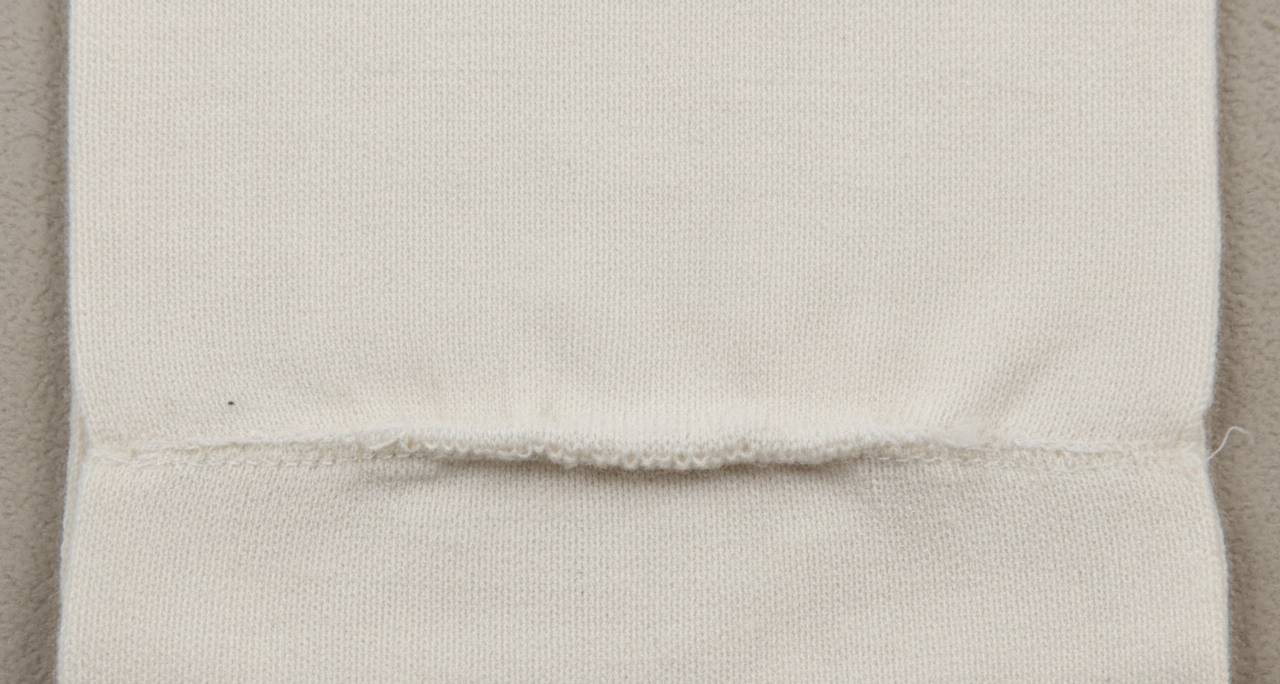
Common: Horizontal bands at the roll start or after machine stops. These are caused by unstable take-down or compaction and tension transients.
The effect is primarily aesthetic, but buyers often reject rolls with visible start-up creases. These bands destroy the uniformity of the fabric and can ruin garments made from the affected sections.
Prevention means cutting off the first few meters of fabric, a gradual ramp-up on restart, and following standard start-up procedures. This may seem wasteful, but it is much cheaper than risking the rejection of an entire roll.

Set‑up mark / start‑up crease
  • Looks like: Horizontal band at roll start or after stops.
  • Causes: Take‑down/compaction not stabilized, tension transients.
  • Prevention: Scrap first few meters, gradual ramp on restart, standard start‑up SOP.

Loop mark / press‑off / tucking defects
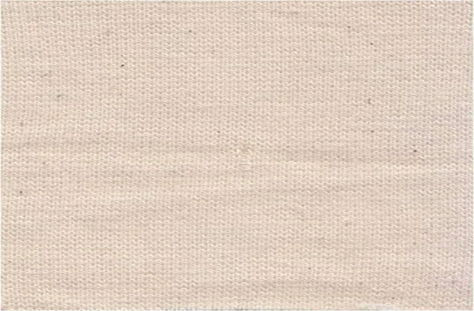
These defects show as irregular loops or stitch formations, sometimes resembling “bird’s‑eye” specks.
Reasons include wrong cam/tuck timing, high yarn friction, or variable feed. This causes uneven fabric appearance which becomes more visible after dyeing.
Prevention requires checking cam timing, polishing guides, and a continuous feed through positive feeders. In practice this means regular machine calibration and maintenance to ensure smooth yarn flow

Loop mark / press‑off / tucking defects
  • Looks like: Irregular loops or stitch formation, “bird’s‑eye” specks.
  • Causes: Incorrect cam/tuck timing, high yarn friction, variable feed.
  • Prevention: Cam timing verification, guide polishing, constant feed via positive feeders.

Barre (horizontal stripiness)

Barre defects show up as repeating shade bands around the fabric circumference.
Causes are yarn lot mixing, variation of feeder tension, distribution of needle wear, cylinder out-of-round or variable stitch length. The effect is an irregular color after dyeing, which is considered a major fault by the buyer.
You can prevent it by using the same yarn batch per roll, mapping loop length feeder-wise, rotating cylinder elements and statistical process control on loop length. Factories often maintain yarn lot segregation policies to prevent cones from different batches from being mixed.
Barre (horizontal stripiness)
  • Looks like: Repeating shade bands around circumference.
  • Causes: Yarn lot mixing, feeder tension variation, needle wear distribution, cylinder out‑of‑round, variable stitch length by feeder.
  • Prevention: Same yarn batch/lot per roll, feeder‑wise loop length mapping, rotate cylinder elements, SPC on loop length (per feeder trend).

Spirality / skew (single jersey)

In single jersey fabrics, spirality appears in the form of wale angles that are not vertical, resulting in twisting of side seams in garments.
The cause may be a twist bias in the yarn, an incorrect stitch length, or too much take-down tension. The impact is garments with twisted side seams, which customers perceive as low quality.
Prevention is balanced yarn twist, stitch length optimization, relaxation and compaction, and testing to AATCC standards. Factories often perform spirality tests before bulk production to ensure garments will hold their shape.
  • Looks like: Wale angle deviates from vertical; side seam twist in garments.
  • Causes: Yarn twist bias vs machine direction, stitch length too tight/loose, high take‑down.
  • Prevention: Balanced yarn twist, optimized stitch length, relaxation and compaction; test according to AATCC 199/179.

Needle lines / vertical lines

Fine continuous vertical streaks are caused by damaged needles, bent jacks or dirty tricks.
The effect is visible lines that spoil fabric appearance. Prevention comes down to replacing suspect needles in groups and routine cleaning of tricks. Operators must be trained to identify needle lines early as they often run continuously across rolls.
  • Looks like: Fine continuous vertical streak.
  • Causes: Damaged individual needle/sinker track, bent jack, dirty trick.
  • Prevention: Replace suspect needles in groups; routine trick cleaning.

Feeder line / stripe

Narrow circumferential bands are seen at one or more feeders. Causes are off-spec cones, tension changes or elastane draft shifts.
The effect is stripe defects that destroy fabric uniformity. Prevention involves feeder swapping during trials, strategies for cone pairing, and feeder tension calibration.

  • Looks like: Narrow circumferential band at one or more feeders.
  • Causes: Off‑spec cone, tension change, elastane draft change on one feeder.
  • Prevention: Swap feeder positions during trials, cone pairing strategy, feeder tension calibration.

Tension bands / take‑down variation

Inconsistent take‑down speed or pressure causes alternating tight and loose bands horizontally.
This results in uneven fabric density, which affects GSM and garment fit. Closed-loop take-down systems, drive belt checks and pressure roll cleaning are all preventative measures.

  • Looks like: Alternating tight/loose bands horizontally.
  • Causes: Inconsistent take‑down speed/pressure, brake issues on take‑up.
  • Prevention: Closed‑loop take‑down, check drive belts, pressure roll cleaning.

Yarn out (missing yarn / end out)
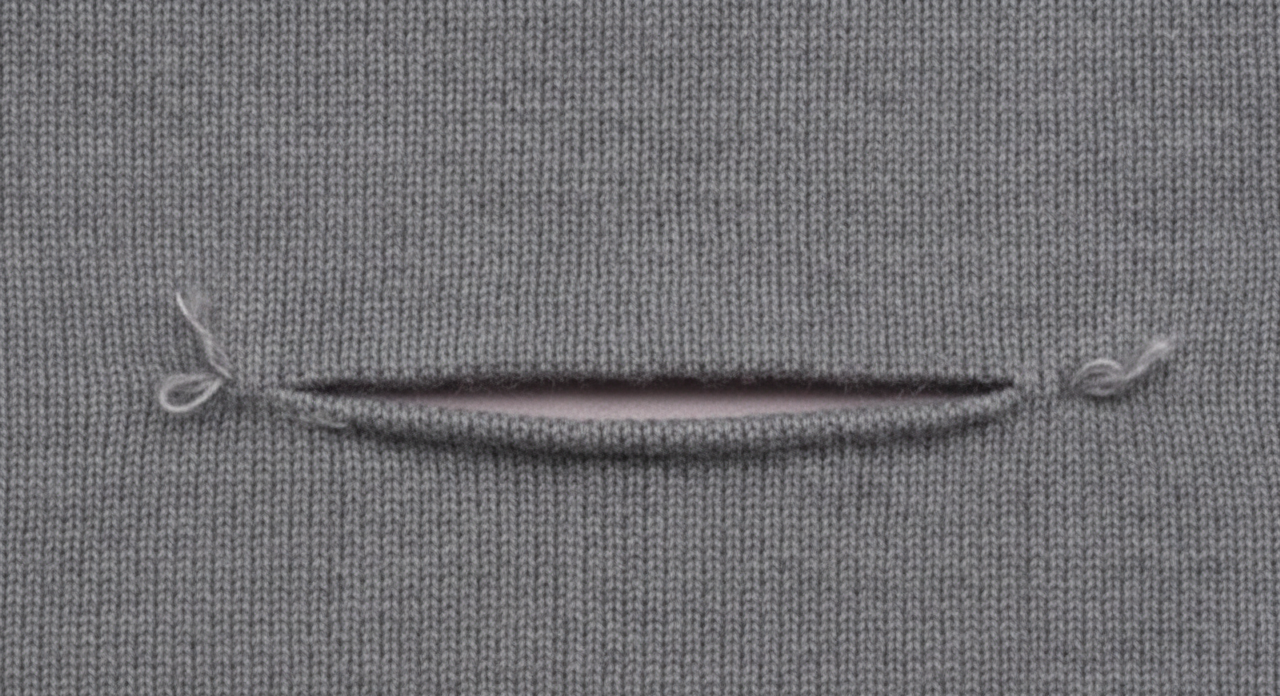
When cones run out or yarn breaks without stop motion, thin horizontal lines or structural gaps occur.
The impact is serious because missing yarn creates weak points in the cloth. Prevention needs sensitive yarn break sensors, stop motion systems and proper SOPs for cone change.

Yarn out
Yarn out
  • Looks like: Thin horizontal line (for weft feeders) or structural gap.
  • Causes: Cone run‑out, yarn break with failed stop.
  • Prevention: Yarn break sensors/stop motion sensitivity, cone change SOP.

Mis‑plating (plated jersey)

Random flecks of back yarn may appear on the face yarn, and the face and back yarns may change.
The result is plating defects that the buyers reject. Prevention is a matter of correct plating spacing, synchronized feeds and regular plating checks.
  • Looks like: Face/back yarns swapped; random flecks of back yarn on face.
  • Causes: Incorrect yarn path heights, feeder mis‑set, overfeed mismatch.
  • Prevention: Set plating spacing precisely, synchronized feeds, regular plating checks.

Puckering at stitch

Corrugated textures are longitudinal when the loop length is too short or yarn tension is too high.
The result is clothing with an irregular surface and bad drape. Prevention requires longer loop length, relaxing greige fabric before finishing, and controlling yarn memory.
  • Looks like: Corrugated texture longitudinally.
  • Causes: Too low loop length, high yarn tension, moisture‑set yarn memory.
  • Prevention: Increase loop length, relax greige before finishing.

Snag (knits)

Snags look like pulled loops on the surface, sometimes called "fisheyes."

This leads to garments with weaknesses and a poor appearance. Prevention includes deburring machine paths, protective handling and snag resistance testing.
  • Looks like: Pulled loop on surface; sometimes “fisheye”.
  • Causes: Sharp machine parts, handling damage, Velcro contact.
  • Prevention: Deburr machine paths, fabric protective handling, test snagging resistance (ASTM D3939).
Wet Processing / Dyeing‑Linked Defects (show on dyed/finished goods)

Wet processing and dyeing are the major stages in the manufacture of knit fabric. The fabric which looks perfect in greige form may have hidden problems that only show after scouring, bleaching, dyeing or finishing. These processes involve chemicals, heat and mechanical handling – all of which can magnify small irregularities into big defects. The most common defects in wet processing and dyeing are explained below in detail.

Shade variation (roll‑to‑roll / within roll)

Shade variation is one of the most common complaints of buyers. It happens when fabric or parts of fabric in the same roll have different colour intensities after dyeing.
Reasons:
  • Variations of thickness on rolls or GSM
  • Greige fabric with residual oils, waxes or finishes
  • Pre-dyeing relaxation state differences
  • Liquor ratio or temperature gradients in dye-bath
Effect:  
Clothes made out of mismatched rolls look uneven, and are immediately rejected. In fashion, where color uniformity is important, variation in shade can be especially damaging.

Prevention:
  • Pre-relax uniform shrinkage fabrics before dyeing
  • Complete scouring to remove waxes and oils
  • Batch plan by GSM and lot carefully
  • Follow strict SOP’s for liquor ratio & temperature control

Patchy / mottled dyeing

Patchy dyeing appears as cloudiness or icy melange effects on solid shades. This may be due to greige contamination, bad levelling, temperature shocks or contact with elastane.
The effect is patchy shade that spoils the look of the garment. Prevention includes good scouring, chelation, controlled temperature ramps and protecting elastane from high heat.
  • Looks like: Cloudy areas; “frosty” melange on solids.
  • Causes: Greige contamination, poor leveling, temperature shocks, elastane exposure.
  • Prevention: Effective scouring + chelation, temperature ramp controls, appropriate leveling agents, protect elastane (<130 °C unless stabilized).

Barre after dye

Dyeing will accentuate barre flaws resulting from yarn inconsistency, cotton maturity or elastane feeding bands.
The effect is horizontal stripiness that buyers rate as major. Prevention requires yarn gating, good lab dips on multiple cones and cylinder/feeder mapping.
  • Amplified by: Yarn variability; different cotton maturity; elastane feeding bands.
  • Control: Yarn gating, robust lab dips across multiple cones, cylinder/feeder mapping.

Tailing / crease marks

Tailing looks like long diagonal or rope marks. Causes: Imbalance of rope twist in dyeing by jet/winch, low liquor turbulence or overloading.
The result is a garment that shows crease lines. Prevention requires rope length optimization, untwisting devices, lower loading and anti-crease agents.
  • Looks like: Long diagonal/rope marks.
  • Causes: Rope twist imbalance in jet/winch, low liquor turbulence, overloading.
  • Prevention: Rope length optimization, untwisting devices, lower loading, anti‑crease.

Oil stains after dye

Oil stains are caused by improper scouring of the knitting oil or machine leaks.
The effect is ugly stains that ruin the appearance of fabric. Prevention needs emulsifying scours, oil types compatible to scour chemistry and preventive maintenance to prevent leaks.
  • Causes: Knitting oil not scoured, machine leaks.
  • Prevention: Emulsifying scours, oil type compatible with scour chemistry, PM to stop leaks.

Uneven compaction marks / width variation

Different bands of GSM or width are due to wear of compactor felt, pressure/temperature non-uniformity and uneven overfeed.
The effect of this inconsistency is a change in fabric weight and width which affects how a garment fits. Prevention requires felt life tracking, cross width temperature mapping and overfeed control.
  • Looks like: Bands of different GSM/width.
  • Causes: Compactor felt wear, pressure/temp non‑uniform, uneven overfeed.
  • Prevention: Felt life tracking, cross‑width temp mapping, overfeed control.

Excessive shrinkage / growth

Fabrics that are relaxed or compacted and not properly treated may shrink or grow. This can also be caused by elastane damage.
Impact: Poor fit and customer complaints due to garments not conforming to size specifications.
  • Causes: Inadequate relaxation/compaction; elastane damage.
  • Prevention: Relax tumble → compaction; set overfeed; validate against ISO 6330/AATCC 135.

Skew after finishing

Skew happens when the stenter chain speeds are out of synch or the tentering is uneven or yarn torque is released.
The effect is garments with twisted seams. For heat-setting, overfeed balance and chain synchronization for blends prevention needs.
  • Causes: Stenter chain speed mismatch, uneven tentering, yarn torque release.
  • Prevention: Chain synchronization, overfeed balance, heat‑set (for blends).
Appearance / Surface Defects (finishing & handling)

Appearance defects are the first to be noticed by the buyer because they directly affect the look and feel of the fabric. Bad finishing or handling can make fabrics look cheap, inconsistent or damaged. Even if the construction is good.

Hairiness / fuzz

Hairiness or fuzz is the appearance of fine fibers standing up from the surface of the fabric, giving it a rough or fuzzy look.

Causes:

  • Easily loses short fibre yarns

  • Abrasive finishing processes for fibres

  • Carryover from brushing operations

Impact: The hairiness makes even new fabrics look worn out. It may also cause problems in garment sewing, as fuzzy surfaces create friction and make handling less smooth.

Control / Prevention:

  • Use compact yarns with longer staple fibre to reduce fibre shedding

  • Apply enzyme or bio‑polish treatments to remove protruding fibres

  • Where applicable, burn off excess fuzz with shear or singeing processes

Pilling (surface pills)

Pilling is the formation of small balls of fibre on the surface of the fabric caused by abrasion and fibre movement.

Reasons:

  • Blending with short staple fibres

  • Loose fabrics that allow fibre movement

  • Continuous rubbing during wear or finishing

Effect: Fabric pilling ruins the appearance of fabrics and makes clothes look old quickly. Fabrics with low pilling grades are usually rejected by buyers.

Prevention / Control:

  • Enzyme or bio‑polish treatments on cotton fabrics

  • Tighter structures with more stitches per area

  • Use anti‑pilling finishes during finishing

  • Choose fibres with longer staple length and lower hairiness

Evaluation: Pilling resistance is tested per ISO 12945‑2 or ASTM D4970, with a target grade ≥ 3–4 for acceptable quality.

Press shine / glazing

Press shine or glazing appears as shiny lanes on the surface of the fabric.

Reasons:

  • Over‑pressing in finishing

  • Hot calendaring contact on cellulose fibres

Impact: Glazing gives a patchy, cheap appearance with uneven shine. It shows up more on darker shades.

Control / Prevention:

  • Reduce temperature and pressure during pressing

  • Add matting softeners to control gloss

  • Utilize the felt side of the calendars instead of direct hot contact

Width bowing / wavy edges

Width bowing occurs when the edges of the fabric are wavy or uneven.

Causes:

  • Unequal tentering in stenter machines

  • Over‑drying of selvedges compared to the body

Impact: The edges become wavy, making it difficult to spread and cut. This causes wastage during garment production.

Control / Prevention:

  • Balance edge pins or clips during stentering

  • Manage moisture profile across the fabric width

Contamination after finishing

Even after finishing, contamination can lead to stains or marks on otherwise good fabric.

Types:

  • Leftovers from equipment or workers

  • Solvent drips during finishing

  • Rust spots from machine frames or rollers

Effect: Contamination destroys buyer confidence and often results in rejection of entire rolls.

Prevention / Control:

  • Keep conveyors and rollers clean

  • Use stainless steel hardware to prevent rust

  • Store fabrics in clean, covered environments

Structural / Construction Defects

Structural defects compromise the integrity of the fabric. Unlike surface issues, these are embedded in the construction and often cannot be corrected once they occur.

Fabric holes at tuck or transfer (rib/interlock/jacquard)

Holes develop at the tuck or transfer points of rib, interlock, or jacquard fabrics.

Reasons:

  • Transfer needle failure during knitting

  • Wrong cam selection for the yarn count

Impact: Holes are critical defects since they damage the fabric structure. Buyers apply zero tolerance to holes.

Prevention / Control:

  • Proper use and care of needles

  • Strict adherence to yarn count vs machine gauge matrix

GSM variation (across or along)

GSM variation means the weight of the fabric per square meter is inconsistent across or along the roll.

Causes:

  • Variable stitch length during knitting

  • Take‑down drift in machines

  • Compaction changes during finishing

Effect: Such fabrics produce garments with uneven weight, drape, and fit.

Prevention / Control:

  • Apply statistical process control (SPC) on loop length

  • Perform regular GSM checks per feeder and after compaction

  • Use closed‑loop take‑down systems for consistency

Width variation / barre across width

Barre or width variation appears as uneven shrinkage or stripiness across the fabric width.

Causes:

  • Differential shrinkage across the fabric width

  • Moisture gradients during finishing

  • Uneven pressure caused by compactor nip wear

Effect: Width differences make garments fit unevenly and look poor. Barre stripiness becomes very visible after dyeing.

Prevention / Control:

  • Pre‑equilibrate moisture before finishing

  • Maintain compactor nip regularly

  • Apply cross‑width thermal profiling for even heat distribution

Inspection & Acceptance (Practical)

4‑Point System (knits)

Assign points per defect size/length:
1 point: ≤ 3″ (≤ 75 mm)
2 points: >3″–6″ (75–150 mm)
3 points: >6″–9″ (150–230 mm)
4 points: >9″ (>230 mm) or any hole

Max allowed: Buyer‑specific (e.g., ≤ 28 points per 100 yd² or ≤ 30 points per 100 m²).

Zero tolerance: Holes, foreign fiber in whites, continuous barre.

Inline controls

Roll‑start scrap, feeder‑wise loop length log, thermal/width log at stenter/compactor, dye house RFT board.

Root‑Cause Map (quick reference)

SymptomLikely root causesFast checks
Horizontal bandsTake‑down/overfeed swings, start‑stop marks, compactor pressure driftCheck drive & pressure trend; scrap start meters
Vertical linesSingle needle/sinker damage, needle lineReplace suspect needles; clean tricks
Spots/specksYarn dust, foreign fiber, oil dripsClean machines; sample under lightbox; EHS leak audit
Stripe with stretch changeElastane break/draft shiftFeeder tension & draft log; elastane path friction
Cloudy shadePoor scouring/levelingDrop test (wetting), check pH profile & chelation

SOP Snippets (you can paste into your QC manual)

Knitting start‑up SOP

  1. Load lot with matched cones by feeder.
  2. Set loop length; record per feeder.
  3. Run 20–30 m scrap; check GSM/width/appearance.
  4. Approve and start bulk with hourly loop‑length audits.

Greige to dye SOP

  1. Relax (24 h for cotton jersey on trolley; avoid stacking heavy).
  2. Inspect and grade using 4‑Point; segregate critical defects.
  3. Batch by GSM ±3%, width ±1 cm, yarn lot same; mark roll IDs.

Finishing SOP

  1. Pre‑wet to even moisture; set tenter/compactor recipe.
  2. Width & skew set; overfeed control; felt condition check.
  3. Verify shrinkage/spirality samples every 2,000 m.

Test Methods to Quantify Risks (recommended)

Pilling: ISO 12945‑2 / ASTM D4970

Bursting strength (knits): ISO 13938‑2 / ASTM D3786

Dimensional change: ISO 6330 / AATCC 135

Skew/spirality: AATCC 199 / AATCC 179

Snagging: ASTM D3939

Air permeability: ASTM D737 / ISO 9237

Final Thought

Knitted fabrics, however, while lauded for their comfort, elasticity and versatility, require a much greater degree of vigilance in production than woven fabrics. Their inter­looped structure means that even the tiniest irregularity — a lint speck, a slub, a missed stitch or a shade variation — can spread quickly or be glaringly obvious after dyeing, finishing or garment assembly. A minor technical fault can quickly turn into expensive rejections, buyer claims and damaged reputations.
The lesson for manufacturers is simple: quality needs to be a culture, not a checklist. Every step — yarn preparation, knitting, wet processing, finishing and inspection — needs discipline, prevention and standardized systems like the 4‑Point inspection method. Preventive maintenance, rigorous housekeeping and operator training are not optional extras; they are the backbone of reliable production.
In the end, the strength of a textile business is not just about producing fabrics to specifications but it’s about consistently providing materials that buyers can feel confident about. Factories that build quality into every process can cut defects, protect their brand value and build long-term trust in the global market. In the competitive arena of fashion and textiles, quality is the silent ambassador of every garment.


References & Sources
  1. Santoni S.p.A. – Technical documentation on seamless and circular knitting processes.
  2. Karl Mayer Group – Knitting process control and fabric defect analysis publications.
  3. SDL Atlas – Textile testing instrumentation and quality control references.
  4. James Heal Ltd. – Technical resources on pilling, snagging, dimensional stability, and fabric performance testing.
  5. Mesdan Lab – Laboratory equipment references for textile quality evaluation.
  6. ASTM International – Standards including ASTM D3786, ASTM D3939, ASTM D4970, ASTM D737 and related textile testing methods.
  7. ISO (International Organization for Standardization) – Standards including ISO 6330, ISO 9237, ISO 12945, ISO 13938 and related textile quality assessment procedures.
  8. AATCC (American Association of Textile Chemists and Colorists) – Standards including AATCC 135, AATCC 179, AATCC 199 and colorfastness evaluation methods.
  9. Global Apparel Brand Quality Manuals (H&M, Inditex/Zara, M&S, Decathlon, Target, Walmart, Nike, Adidas and others) for commonly adopted defect acceptance criteria, spirality limits, pilling requirements, and knit fabric quality benchmarks.

Disclaimer: This content is intended for educational and training purposes only. Knit fabric defects, defect classifications, root causes, preventive actions, acceptance criteria, and testing requirements may vary depending on fabric construction, fiber composition, machine technology, processing route, buyer requirements, and factory procedures. The examples and limits mentioned are typical industry practices and should not be considered universal standards. For commercial production and quality approval decisions, users should follow applicable customer specifications, factory SOPs, ASTM, ISO, and AATCC standards.

Written by
Alam Mohammad Shafiqul
Lead Editor, Contributor
Textile Technology

Over 15 years of experience in textile engineering, Sweater & tech development. Passionate about bridging the gap between factory-floor practice and technical knowledge.

Textile Engineering Sweater Lean Six Sigma
Comment 
Comments 0

Be the first to comment!

Leave a Comment
TexSensei
TexSensei
Textile AI
👋 Hi! I'm TexSensei, your textile AI.
how can I help you?.

Groq LLaMA 3.1 · FAISS · all-MiniLM-L6-v2 · Browse Articles