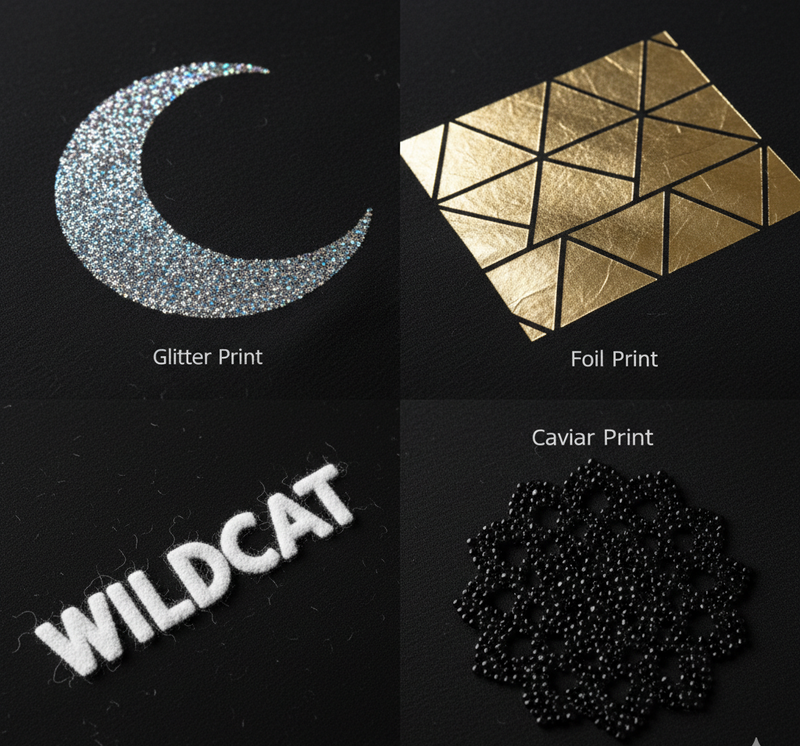
Specialty printing techniques such as Glitter, Foil, Flock and Caviar Bead printing are widely used in the fashion and garment industry to create decorative, high‑value and visually appealing designs. Each method offers unique textures, finishes and aesthetic effects that enhance garment styling and help brands differentiate their products in the marketplace.
Glitter, Foil, Flock & Caviar Bead Print
Glitter Printing
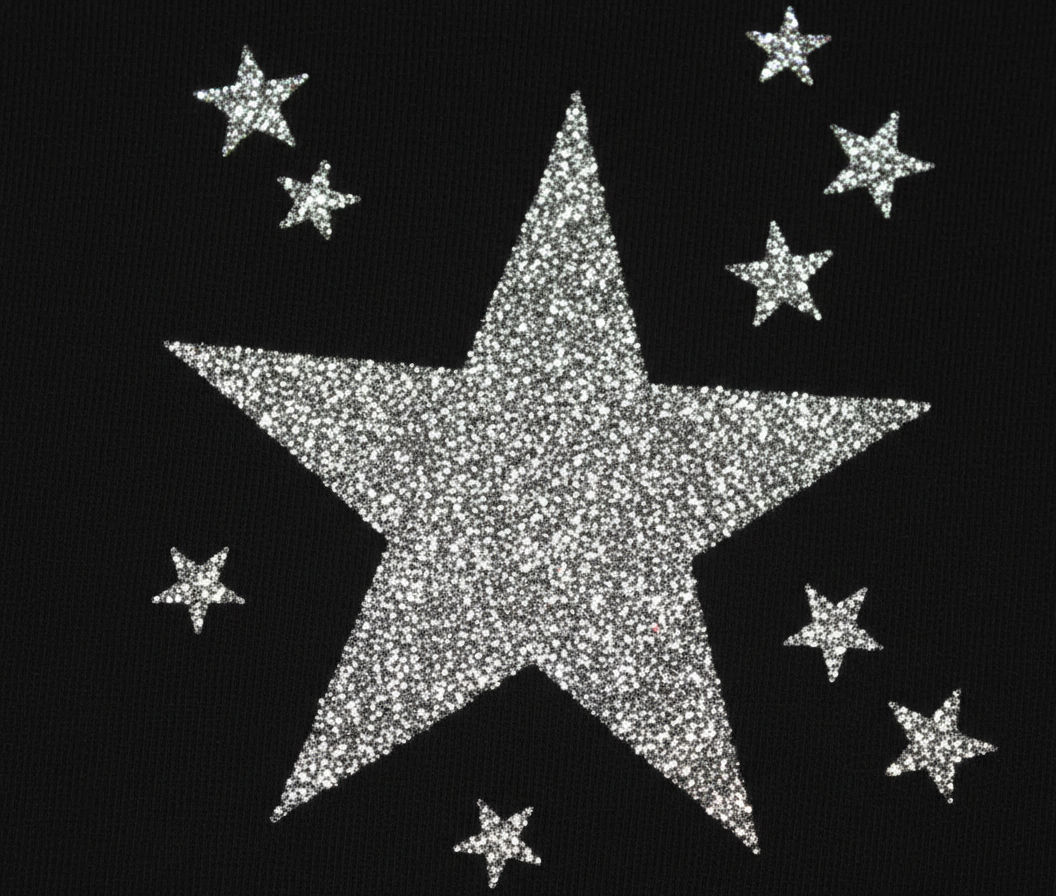
Glitter printing is a decorative textile embellishment technique that uses glitter particles combined with adhesive or plastisol bases to create sparkling, eye‑catching designs on fabrics and garments. It is widely used in fashion wear, children’s clothing, party outfits, dance costumes and promotional garments due to its bold, reflective finish.
Glitter prints add shine, depth and texture, making them popular for both casual and premium apparel markets.
it is a surface printing technique where glitter particles—usually polyester or metallic flakes—are applied onto fabric using a special adhesive, binder or plastisol ink. After heat curing, the glitter becomes firmly bonded, creating a textured, shimmering effect that catches and reflects light.
Glitter Printing
Key Features
High visual impact
Rough and textured hand feel
Strong light reflection
Long-lasting sparkle when cured properly
Types of Glitter Printing
Standard Glitter Printing
This is the most common method, where large glitter particles are mixed into adhesive ink and printed through a screen.
Uses
T-shirts
Kidswear
Fashion tops
Logos and motifs
Dry Glitter Application (Sprinkle Method)
A layer of adhesive is printed first, then dry glitter powder is sprinkled manually or mechanically on top.
Uses
Large surface designs
Custom craft printing
Festival apparel
High-Density Glitter Printing
Achieved by using thick plastisol bases that allow glitter to sit on a raised, dimensional surface.
Uses
3D glitter logos
Premium branding
Fashion garments requiring bold textures
Foil + Glitter Combination Printing
A hybrid method where glitter particles are combined with foil adhesives to create super-reflective, metallic‑glitter finishes.
Uses
Luxury garments
Stage costumes
Party wear
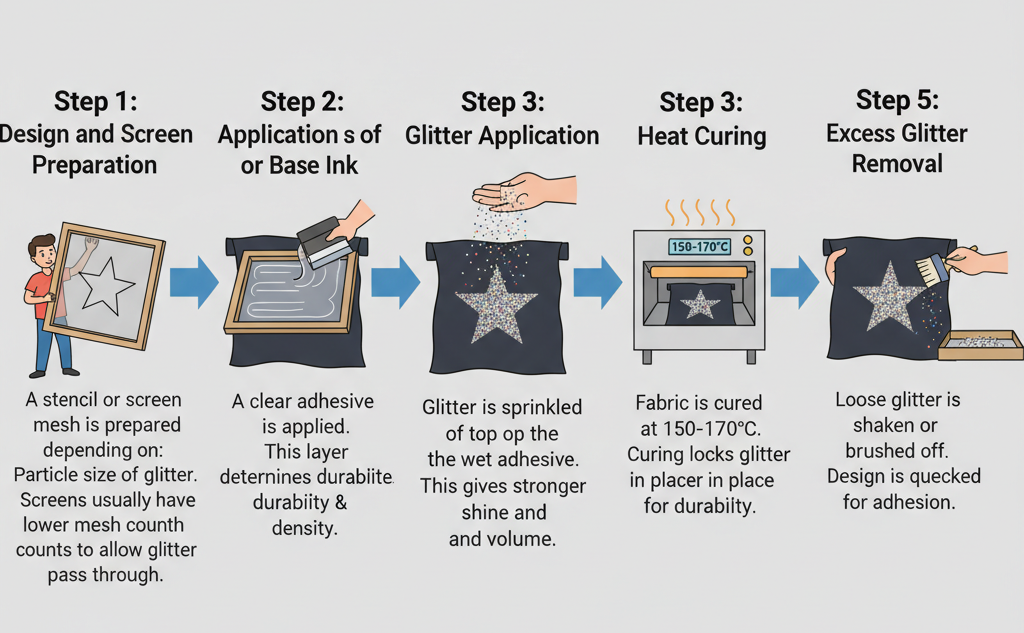
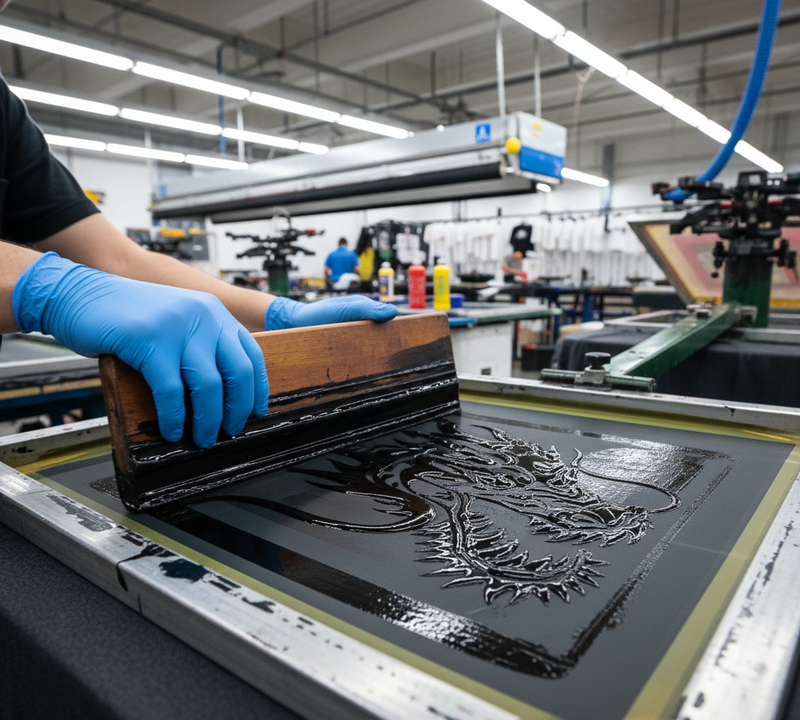
Process of Glitter Printing
Process of Glitter Printing
Step 1: Design and Screen Preparation
A stencil or screen mesh is prepared depending on:
Particle size of glitter
Required print detail
Screens usually have lower mesh counts to allow glitter to pass through.
Step 2: Application of Adhesive or Base Ink
Adhesives may include:
Clear adhesive paste
Glitter-specific binders
Plastisol inks
The adhesive layer determines:
Durability
Wash fastness
Glitter density
Step 3: Glitter Application
There are two common methods:
Mixed-in glitter (premixed with ink)
Sprinkled glitter (applied on top of wet adhesive)
The sprinkling method gives stronger shine and volume.
Step 4: Heat Curing
Printed fabric is cured at:
150–170°C depending on adhesive and fabric type
Curing locks glitter in place and ensures wash durability.
Step 5: Excess Glitter Removal
After curing and cooling:
Loose glitter is shaken or brushed off
Design is quality-checked for density and adhesion
Suitable Fabrics for Glitter Printing
Best Options
Cotton
Cotton blends
Polyester
Viscose
Lycra/spandex blends
Canvas and denim
Avoid or Use With Caution
Very stretchy fabrics (unless using stretch binders)
When cured properly, glitter can last long without shedding.
Limitations of Glitter Printing
Rough Hand Feel
The surface can feel scratchy compared to other print types.
Lower Detail Precision
Not suitable for highly detailed micro designs due to particle size.
Heavier Print Weight
Glitter areas may feel bulkier than normal screen prints.
Requires Careful Washing
Gentle cycles recommended to extend glitter life.
Applications of Glitter Printing
Fashion Garments
Women’s tops
Party wear
Boutique clothing
Trendy casualwear
Kidswear
Cartoon designs
Sparkle text prints
Fun seasonal graphics
Sports & Dance Costumes
Cheerleading outfits
Dancewear
Stage performances
Promotional Items
Tote bags
Festival merchandise
Event giveaways
Craft & DIY Projects
Custom birthday T-shirts
Personalized gift apparel
Why Choose Glitter Printing?
Glitter printing is perfect when a design needs:
Strong visual impact
Eye-catching shine
Decorative, premium feel
It remains a popular choice among fashion brands, garment manufacturers and printing studios looking to add sparkle and dimension to their fabric prints.
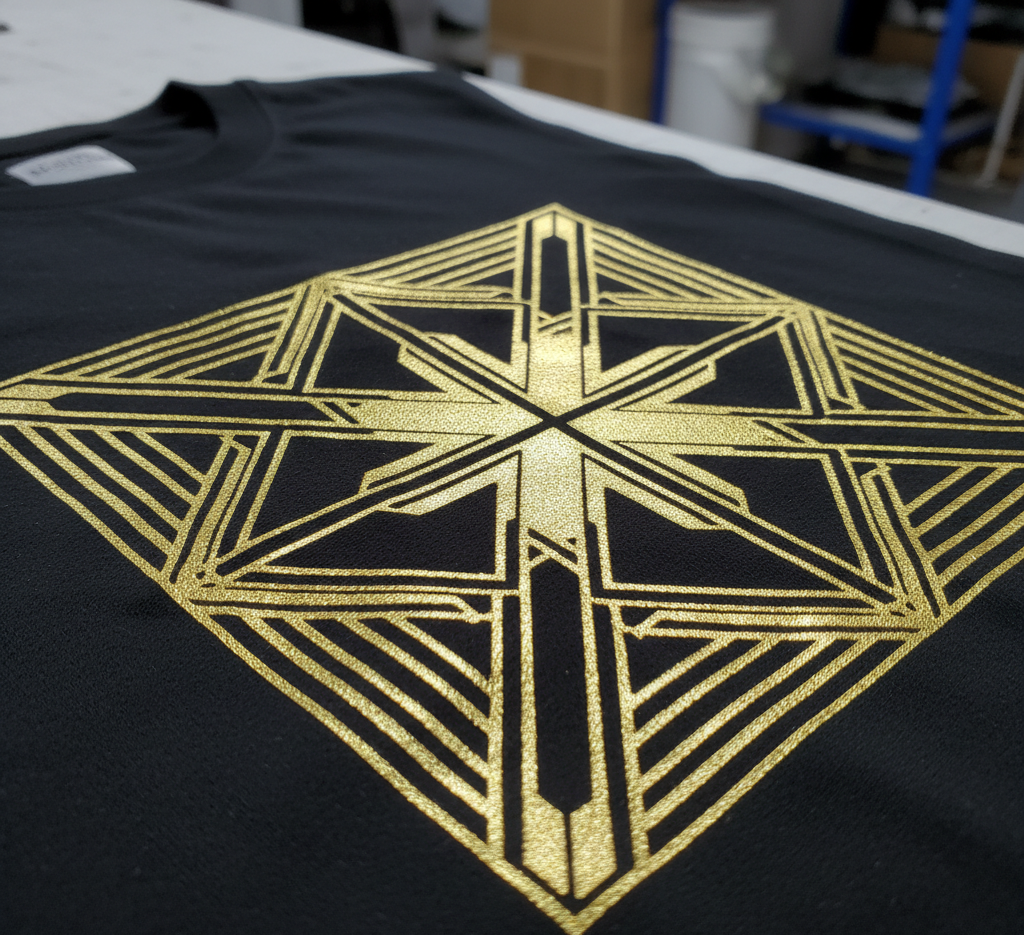
Foil Printing
Foil printing is a premium textile embellishment technique used to create reflective, metallic and high‑gloss designs on garments and fabrics. It gives a luxurious finish and is widely used in fashion apparel, party wear, branding and decorative textile applications. The foil adds a shiny metal-like appearance that enhances visual appeal and product value.
Foil printing is popular for its bright metallic shine, bold richness and ability to stand out on both light and dark fabrics.
it is a surface decoration method that transfers metallic foil onto fabric using a special adhesive and heat press. Unlike traditional printing, foil sits on top of the fabric as a thin metallic layer, creating a reflective and glossy finish.
Foil Printing
Key Features
Extremely shiny and eye-catching finish
Smooth and slightly raised texture
Available in various colors (gold, silver, rose gold, holographic, etc.)
Ideal for logos, text, fashion motifs and garment accents
Types of Foil Printing
1. Standard Foil Printing
This method uses metallic foil sheets and a specially formulated adhesive to transfer the foil onto the fabric.
Main Chemicals
Material
Chemical Formula
Aluminum (Metallic Layer)
Al
Polyester Film Carrier (PET)
(C₁₀H₈O₄)ₙ
Acrylic Adhesive
(C₃H₄O₂)ₙ
Polyurethane Adhesive
(C₃H₈N₂O)ₙ
Characteristics
Bright metallic finish
Smooth reflective surface
Good durability
Available in gold, silver, copper, and colored metallic shades
Uses
T-shirts
Hoodies
Fashion dresses
Kidswear and party outfits
2. Cracked Foil Printing
A specialty effect where the foil layer is intentionally cracked after curing to create a distressed or vintage appearance.
Main Chemicals
Material
Chemical Formula
Aluminum Foil Layer
Al
PET Carrier Film
(C₁₀H₈O₄)ₙ
Acrylic Adhesive
(C₃H₄O₂)ₙ
Characteristics
Vintage appearance
Distressed metallic effect
Fashion-forward aesthetic
Unique texture
Uses
Retro fashion collections
Boutique apparel
Artistic prints
3. Foil + Screen Printing Combination
A hybrid technique combining foil with other print systems such as plastisol, puff, high-density, or glitter printing.
Additional Chemicals
Material
Chemical Formula
PVC Resin (Plastisol)
(C₂H₃Cl)ₙ
Silicone Ink
(C₂H₆OSi)ₙ
Glitter (Polyester)
(C₁₀H₈O₄)ₙ
Aluminum Flakes
Al
Characteristics
Multi-layer effects
Enhanced depth
Mixed texture appearance
Premium visual impact
Uses
High-fashion garments
Boutique branding
Complex artwork designs
4. Holographic Foil Printing
Uses specially engineered holographic foil that reflects multiple colors depending on the viewing angle.
These three components form the foundation of nearly all textile foil-printing processes, whether standard, cracked, combination, or holographic foil effects.
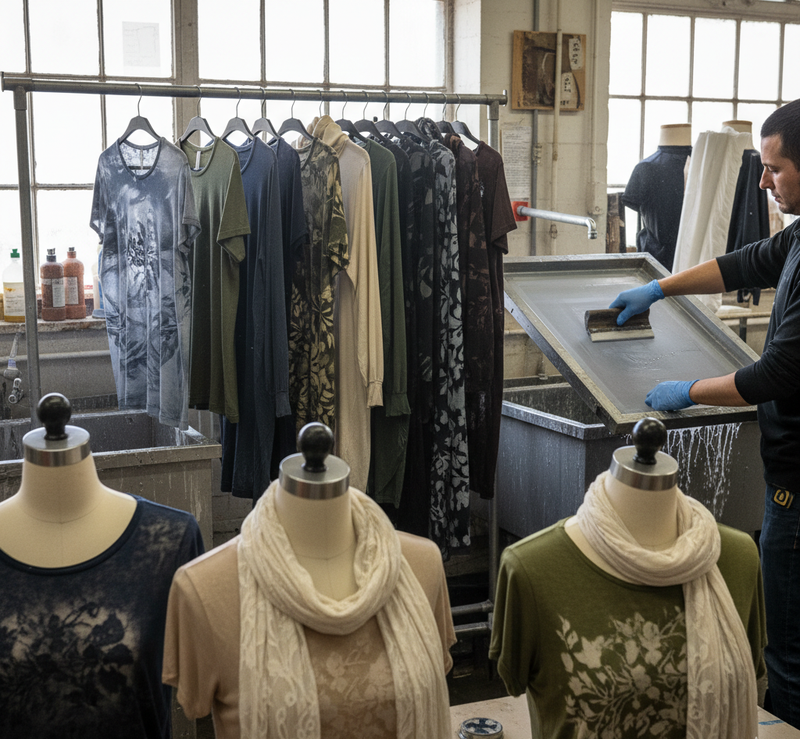
Foil Printing Process
Foil Printing Process
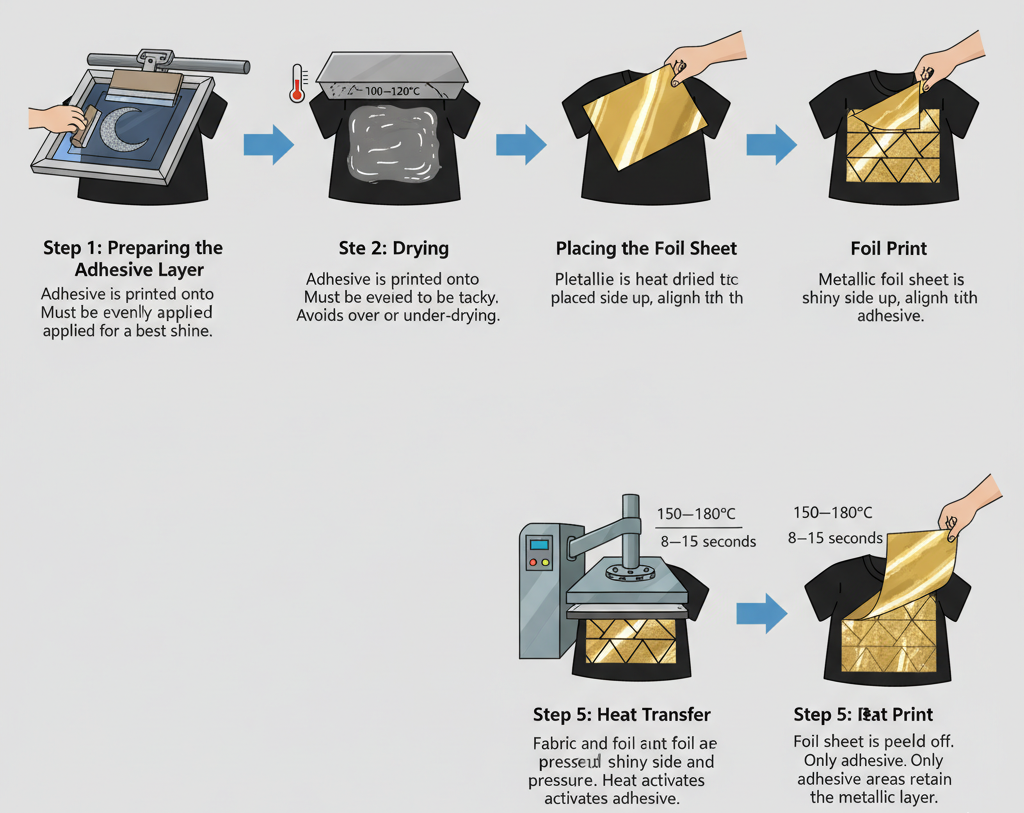
Step 1: Preparing the Adhesive Layer
Adhesive (also known as foil glue) is printed onto fabric using screen printing.
Characteristics of the adhesive:
Transparent or milky
Sticky after drying
Must be evenly applied for best shine
Step 2: Drying the Adhesive
The printed adhesive layer is heat dried to make it tacky but not fully cured.
This stage is crucial because:
Over‑drying reduces foil bonding
Under‑drying causes smudging
Step 3: Placing the Foil Sheet
After drying:
A metallic foil sheet is placed shiny side up
The fabric and foil are aligned and prepared for transfer
Step 4: Heat Press Transfer
The fabric and foil are pressed under heat:
Typical temperature: 150–180°C
Pressure: Medium to firm
Time: 8–15 seconds
Heat activates the adhesive and bonds the foil to the printed areas.
Step 5: Peeling the Foil Sheet
After the heat press:
The foil sheet is peeled off (hot or cold peel depending on foil type)
Only the areas with adhesive retain the metallic layer
Foil creates a glamorous, metallic effect ideal for high-end garments.
Strong Visual Impact
Highly reflective finish attracts attention, perfect for branding and fashion motifs.
Wide Color Variety
Foils are available in:
Gold
Silver
Rose gold
Copper
Holographic
Rainbow
Metallic blue, red, green, etc.
Durable Surface (When Properly Cured)
Strong bonding ensures long-lasting shine and resistance to peeling.
Limitations of Foil Printing
Hand Feel
Foil has a noticeable texture and may feel slightly stiff on large print areas.
Wash Sensitivity
Requires gentle washing to avoid peeling over time.
Not Suitable for Highly Detailed Designs
Fine lines may not transfer well due to foil thickness.
Higher Production Cost
More expensive than standard screen printing due to foil sheets and heat press process.
Applications of Foil Printing
Fashion Industry
Premium tops
Party wear
Designer dresses
Branding accents
Streetwear & Casualwear
Logo prints
Typography
Iconic graphics
Kidswear
Stars, shapes, cartoon motifs
Birthday and seasonal prints
Performance & Stage Costumes
Dance outfits
Cheerleading uniforms
Concert costumes
Accessories
Tote bags
Scarves
Caps
Fashion pouches
Why Brands Choose Foil Printing
Foil printing adds unmatched shine, glamour and fashion-forward appeal to garments. Its premium finish, versatility in colors and compatibility with other printing techniques make it a favorite among fashion labels, merchandising companies and garment manufacturers. Whether used for bold logos or elegant accents, foil printing elevates product value and consumer appeal.
Flock Printing
Flock printing is a decorative textile process that creates a velvety, suede-like texture on fabric surfaces by applying short fibers (called flock) onto an adhesive‑printed design. This technique adds dimension, richness and luxury to garments and is widely used for fashion, sportswear, kidswear and branding applications.
Flock prints stand out because of their raised, soft-touch texture and bold color intensity.
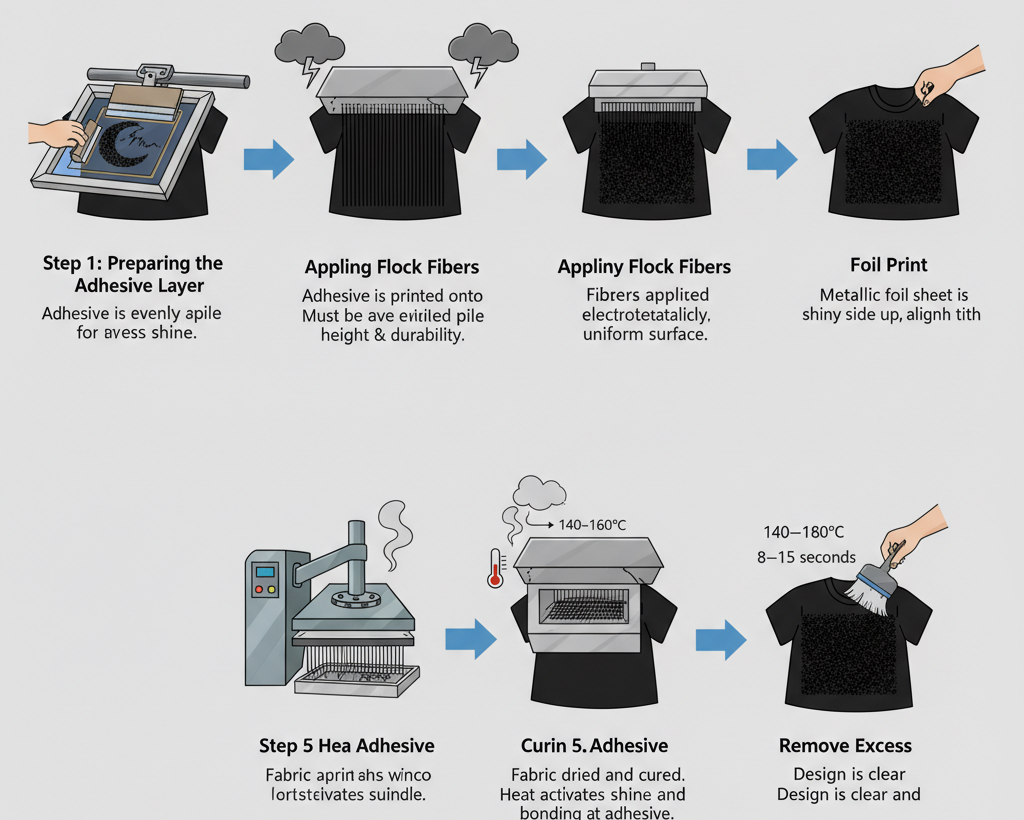
it is a surface embellishment method in which short-cut fibers (usually 0.5–1 mm) are electrostatically applied onto a printed adhesive. The fibers stand upright, creating a velvet pile effect.
Flock Printing
Key Features
Rich velvet-like texture
3D raised appearance
Durable and wash‑resistant when properly cured
Available in many colors (solid, neon, glitter flock, etc.)
Types of Flock Printing
Flock printing creates a soft, velvet-like surface by applying short fibers (flock) onto an adhesive-coated design. The fibers are typically made from rayon, nylon, polyester, or acrylic and are bonded to the fabric through heat and pressure.
Direct Flock Printing
In this method, an adhesive is printed directly onto the garment, and flock fibers are deposited using an electrostatic flocking machine.
Main Chemicals
Material
Chemical Formula
Rayon Flock (Cellulose)
(C₆H₁₀O₅)ₙ
Nylon Flock
(C₆H₁₁NO)ₙ
Polyester Flock (PET)
(C₁₀H₈O₄)ₙ
Acrylic Adhesive
(C₃H₄O₂)ₙ
Polyurethane Adhesive
(C₃H₈N₂O)ₙ
Characteristics
Soft velvet texture
Good coverage
Durable finish
Rich, premium appearance
Uses
Sportswear logos
Large velvet motifs
Fashion garments
Flock Heat Transfer Printing
Flock designs are pre-cut or pre-printed on transfer sheets and then applied to garments using a heat press.
Main Chemicals
Material
Chemical Formula
Polyester Transfer Film
(C₁₀H₈O₄)ₙ
Nylon/Rayon Flock Fibers
(C₆H₁₁NO)ₙ / (C₆H₁₀O₅)ₙ
Heat-Activated Adhesive (PU)
(C₃H₈N₂O)ₙ
Characteristics
Precise design edges
Excellent customization
Suitable for small production runs
Consistent quality
Uses
Names and numbers on jerseys
Customized apparel
Caps, bags, and accessories
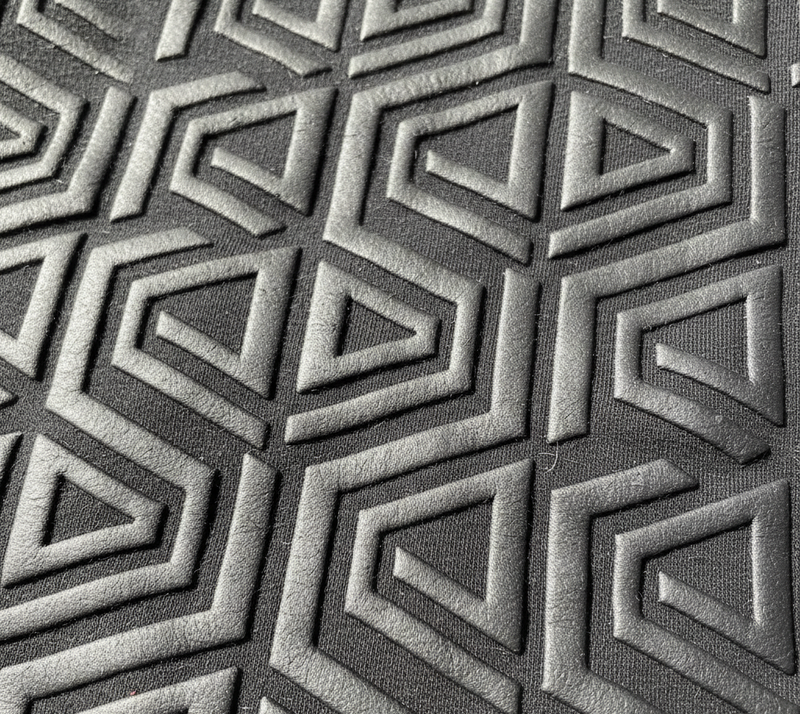
High-Density Flock Printing
This technique combines a thick adhesive layer with flock fibers to create an elevated 3D velvet effect.
High-Density Flock Print
Main Chemicals
Material
Chemical Formula
High-Build Acrylic Adhesive
(C₃H₄O₂)ₙ
Polyurethane Resin
(C₃H₈N₂O)ₙ
Nylon Flock Fibers
(C₆H₁₁NO)ₙ
Characteristics
Raised 3D appearance
Thick velvet texture
Premium branding effect
Excellent visual depth
Uses
Premium streetwear
Branding elements
Thick velvet logos
Multicolor Flock Printing
Different colored flock fibers are applied in separate sections or layers to create multi-tone and complex designs.
Creates a rich, soft, raised tactile finish unmatched by most printing types.
High Visual Impact
Vibrant colors and 3D effect make designs pop.
Durable & Wash‑Resistant
Once cured, flock adheres strongly and stays vibrant for many wash cycles.
Suitable for Branding
Commonly used in:
Logos
Badges
Letters
Numbers
Wide Variety of Options
Available in:
Solid colors
Glitter flock
Metallic flock
Fluorescent flock
Limitations of Flock Printing
Heavier Print Hand Feel
Thicker and heavier than normal screen prints.
Not Ideal for High-Detail Artwork
Fine lines may not be sharp due to fiber size.
Higher Production Cost
Requires electrostatic equipment or pre‑cut transfers.
Wash Care Needed
Harsh washing can reduce lifespan.
Applications of Flock Printing
Fashion & Lifestyle Apparel
Sweatshirts
Hoodies
T-shirts
Jackets
Kidswear
Fun graphics
Animal motifs
Velvety shapes and letters
Sportswear
Player numbers
Team logos
Club emblems
Home Textiles
Cushion covers
Throws
Decorative panels
Branding & Accessories
Caps
Bags
Labels
Patches
Why Brands Choose Flock Printing
Flock printing adds a luxurious, tactile and visually striking finish to garments. Its durability, depth and velvety softness make it ideal for premium apparel, branding and creative textile applications. Whether used on casualwear or high-fashion pieces, flock printing instantly enhances product value.
Caviar Bead Printing
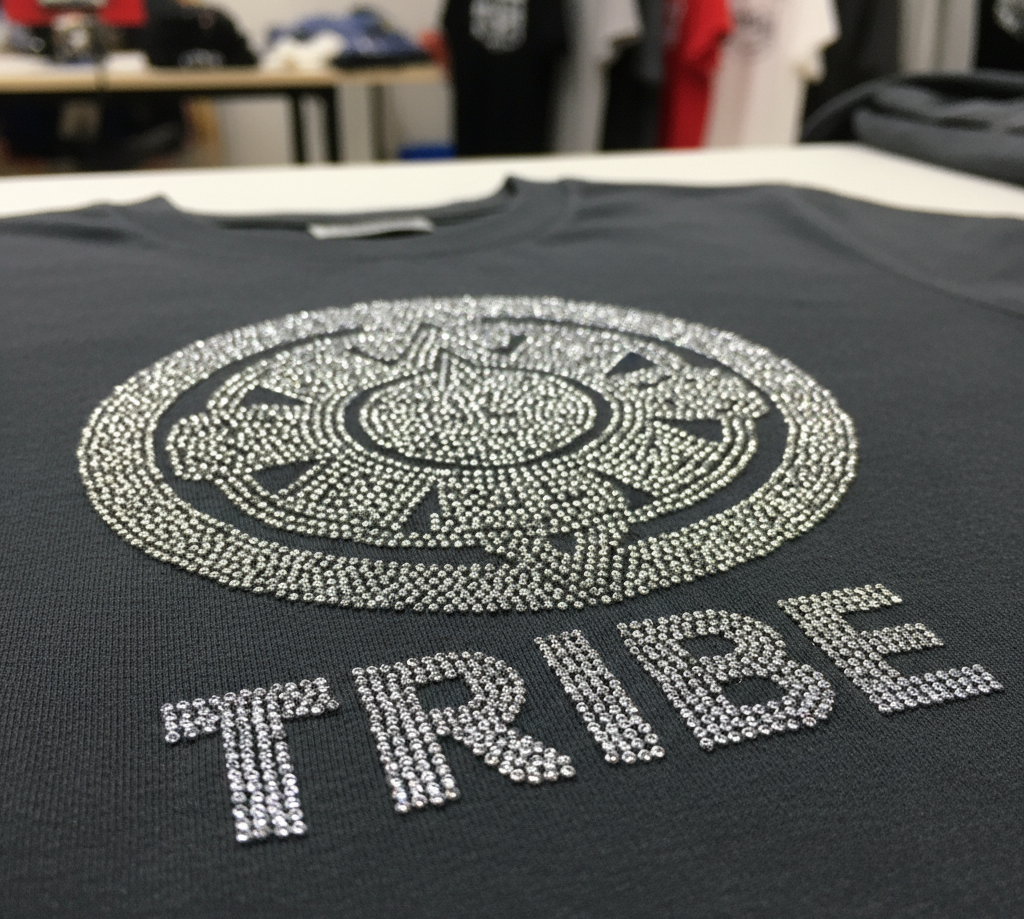
Caviar bead printing—also called micro bead, sugar bead or bubble bead printing—is a decorative surface embellishment that creates a raised, tactile, jewel‑like finish by bonding tiny spherical beads onto selected areas of a fabric. It’s popular in fashion tops, kidswear, couture accents, eveningwear, branding badges and accessories where sparkle, texture and dimension are desired.
Caviar beads can be clear, matte, pearl, metallic, neon or iridescent, yielding anything from subtle shimmer to bold, gemstone‑like highlights.
it is a two‑stage process: first, a patterned adhesive is printed onto the textile; second, microscopic polymer or glass beads are deposited on the adhesive and cured so the beads lock upright into a dense, domed layer. The result is a bead‑pile that looks like clustered caviar, adding 3D relief, sparkle and luxury appeal to garments.
Caviar Bead Printing
Key Features
Distinct 3D micro‑bead texture
High visual impact with light refraction and sparkle
Compatible with logos, borders, texts, motifs
Works on many fabrics with the right adhesive system
Types of Caviar Beads & Effects
Caviar printing creates a three-dimensional textured effect by bonding tiny beads onto a printed adhesive layer. Different bead materials produce different visual and tactile effects.
1. Polymer (Acrylic/Styrene) Beads
Lightweight, economical beads available in a wide range of colors and particle sizes (typically 200–800 μm).
Main Chemicals
Material
Chemical Formula
Polystyrene (PS)
(C₈H₈)ₙ
Polymethyl Methacrylate (PMMA / Acrylic)
(C₅H₈O₂)ₙ
Color Pigments
Various formulations
Characteristics
Lightweight
Cost-effective
Easy to process
Available in many colors and finishes
Use Cases
Fashion T-shirts
Kidswear
Branding trims
Promotional apparel
2. Glass Micro Beads
Heavier beads that provide superior brilliance, reflectivity, and sparkle.
Main Chemicals
Material
Chemical Formula
Soda-Lime Glass
SiO₂ + Na₂O + CaO
Silica (Primary Component)
SiO₂
Characteristics
High brilliance
Strong sparkle effect
Premium appearance
Excellent light reflection
Use Cases
Couture accents
Premium womenswear
Eveningwear
Luxury fashion
3. Iridescent, Metallic & Pearl Beads
Specially coated beads that produce color-shifting, metallic, or pearl-like effects.
Main Chemicals
Material
Chemical Formula
Titanium Dioxide Coating
TiO₂
Iron Oxide Coating
Fe₂O₃
Mica Substrate
KAl₂(AlSi₃O₁₀)(OH)₂
Aluminum Metallic Coating
Al
Characteristics
Color-shift effect
Metallic shine
Pearl luster
Luxury visual appearance
Use Cases
Occasion wear
Festive collections
Fashion embellishments
Limited-edition garments
4. Glow-in-the-Dark / Neon Beads
Designed to provide bright fluorescent colors or glow effects after exposure to light.
Main Chemicals
Material
Chemical Formula
Strontium Aluminate (Photoluminescent)
SrAl₂O₄
Zinc Sulfide (Traditional Glow Pigment)
ZnS
Fluorescent Pigments
Various organic compounds
Characteristics
Glow after light exposure
High visibility
Bright neon appearance
Eye-catching effects
Use Cases
Kidswear
Streetwear
Event merchandise
Promotional products
Common Adhesives Used in Caviar Printing
Adhesive Type
Formula/Composition
Acrylic Binder
(C₃H₄O₂)ₙ
Polyurethane Binder
(C₃H₈N₂O)ₙ
Water
H₂O
Key Chemical Symbols for Caviar Printing
Polystyrene (PS) → (C₈H₈)ₙ
Acrylic (PMMA) → (C₅H₈O₂)ₙ
Glass/Silica → SiO₂
Titanium Dioxide → TiO₂
Aluminum → Al
Strontium Aluminate → SrAl₂O₄
Zinc Sulfide → ZnS
These are the primary chemical materials used to create the different visual and tactile effects seen in caviar bead printing.
Process Flow of Caviar Bead Printing
Process Flow of Caviar Bead Printing
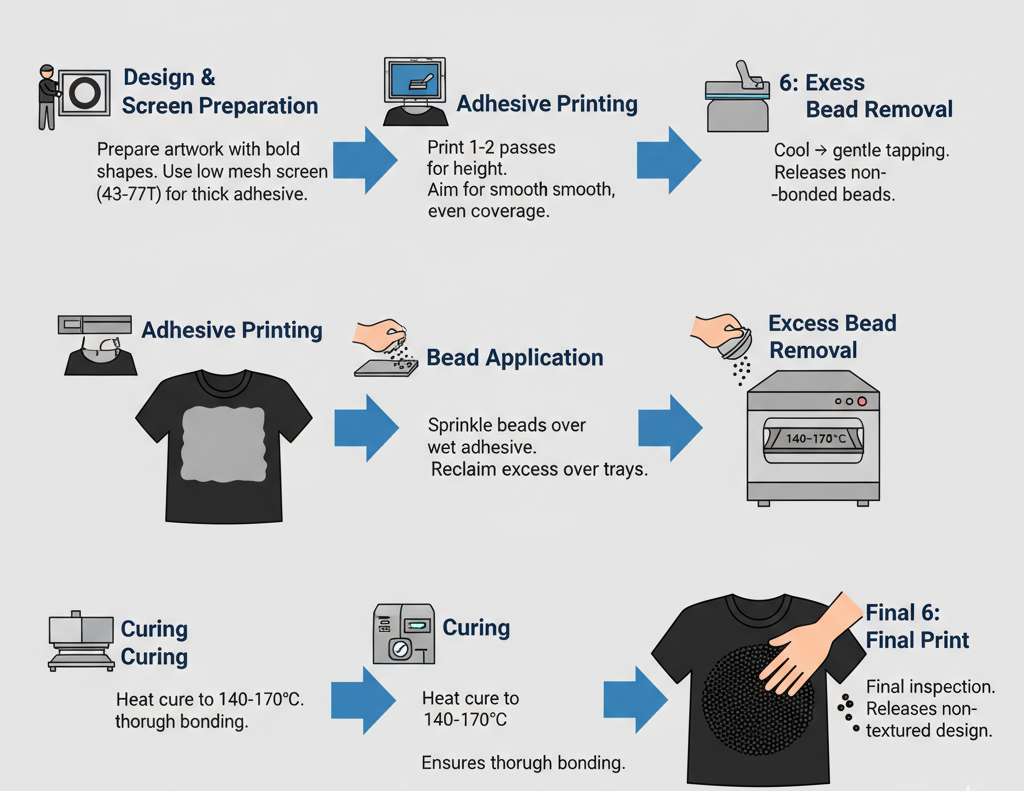
Design & Screen Preparation
Prepare artwork with bold shapes/lines ≥ 0.6–0.8 mm (fine lines may lose bead density).
Use lower mesh screens (e.g., 43–77T / 110–196 US mesh) to deposit adequate adhesive.
Adhesive Selection
Water‑based acrylic: softer hand, eco‑preferred, suitable for cotton and blends.
Plastisol adhesive: high build, strong grab on synthetics; thicker hand.
PU/stretch adhesive: for spandex/athleisure to resist cracking on stretch.
Adhesive Printing
Print 1–2 passes to build controlled height; flash gel if layering.
Aim for smooth, even coverage—voids cause bald spots after bead application.
Bead Application
Sprinkle/shot beads over wet adhesive by tray, shaker or vibratory hopper.
For best yield and cleanup, perform over recovery trays to reclaim excess beads.
Curing
Conveyor dryer or heat press to 140–170°C depending on adhesive type and fabric.
Ensure thorough polymer crosslinking for wash durability.
Excess Bead Removal
Cool → gentle tapping, vibration or air‑blow to release non‑bonded beads.
Final inspection under raking light to catch thin areas.
Suitable Fabrics
Best Options
Cotton and cotton blends (good absorbency for water‑based adhesives)
Polyester & poly/cotton blends (use plastisol or hybrid adhesives)
Denim, canvas, fleece (strong bases for dimensional effects)
Use with Care
High‑stretch jerseys (require PU/stretch adhesive; design with breaks)
Very fine silks or chiffons (weight of beads may distort drape)
Flock base for soft velvet mass, bead linework for gem‑like edges.
Why Buyers Choose Caviar Bead Printing
Caviar bead printing offers a unique combination of visual impact, tactile luxury and premium branding value, which makes it attractive to apparel buyers, fashion designers and brand merchandisers. Compared to standard screen printing methods, caviar beads provide enhanced aesthetics that elevate both basic and high‑end garments.
1. Premium, High‑Value Appearance
Caviar beads create a 3D, jewel‑like effect that immediately increases the perceived value of garments.
Buyers choose this method because:
It gives garments a luxurious, boutique-quality finish
Adds depth, shine and richness that flat prints cannot achieve
Works well for special collections or festive/seasonal styles
This makes caviar bead printing ideal for fashion-forward or upscale brands.
2. Strong Visual Differentiation
In a market saturated with common print methods, caviar beads offer:
Unique texture
High sparkle and light reflection
Distinct “bubble-like” raised effect
This helps brands stand out on retail shelves and online listings.
3. Suitable for Highlighting Key Design Elements
Buyers often use caviar beads to accent:
Logos
Borders
Text
Floral motifs
Geometric shapes
Even small areas of bead application can significantly elevate a garment’s overall look.
This versatility makes it appealing for brands that cover various market segments.
5. Wide Range of Colors and Effects
Buyers choose caviar beads because of the abundant design possibilities:
Clear beads for subtle shine
Neon beads for kids and youth fashion
Metallic beads for luxury garments
Iridescent beads for premium collections
Glow-in-the-dark options for novelty wear
This flexibility helps brands match seasonal trends or brand-specific color themes.
6. Enhances Perceived Craftsmanship
The bead‑pile structure gives garments a handcrafted, artisanal look.
Buyers appreciate that it looks:
More intricate than flat prints
More premium than standard embellishments
Closer to jewelry-inspired detailing
This adds a story and value to the product—important for marketing.
7. Durable and Long-Lasting (When Properly Produced)
Caviar bead prints, when cured correctly, offer:
Strong adhesion
Good wash performance
Long-lasting shine
Shape stability
This durability gives buyers confidence in product quality.
8. Works Well with Other Premium Techniques
Buyers love that caviar beads can be combined with:
Foil printing
Glitter printing
Flock
Puff
Metallic ink
Rhinestones
This allows brands to create multidimensional, trend-driven and visually rich designs.
9. Suitable for Small Motifs (Cost Efficiency)
Even a small amount of caviar bead printing can deliver a premium feel.
This helps buyers:
Maintain reasonable cost
Add value without heavy embellishment
Upgrade simple garments efficiently
10. Ideal for Special Capsules and Limited Editions
Caviar bead printing is often chosen for:
Holiday collections
Valentine’s Day / Christmas / New Year drops
Fashion capsule releases
Premium brand launches
Event or show merchandise
Because it feels special and limited, buyers use it to create exclusivity.
References & Sources
The Textile Institute – Specialty textile printing technologies, glitter printing, foil printing, flock printing, and decorative garment embellishment processes.
AATCC (American Association of Textile Chemists and Colorists) – Textile printing, adhesion testing, durability evaluation, wash fastness, and apparel performance standards.
Society of Dyers and Colourists (SDC) – Specialty print effects, adhesive systems, textile surface decoration, and printing chemistry.
Archroma, Huntsman, CHT, BASF, Dow, Rudolf, and leading textile chemical suppliers' technical resources covering glitter adhesives, foil transfer systems, flock adhesives, plastisol technologies, polyurethane binders, and specialty decorative printing applications.
Textile Research Journal and apparel decoration industry publications on flocking, foil transfer, screen printing, and specialty embellishment technologies.
Disclaimer: This information is intended for educational and industry reference purposes only. Glitter printing, foil printing, flock printing, caviar bead printing, and other specialty embellishment processes may vary depending on adhesive systems, bead materials, flock fiber compositions, curing conditions, heat press parameters, fabric characteristics, machine specifications, chemical supplier recommendations, buyer requirements, and factory operating standards. All specialty printing applications should be validated through laboratory trials, strike-off approvals, wash durability testing, crocking tests, adhesion testing, and approved production standards before bulk manufacturing. Compliance with applicable safety, environmental, ZDHC, OEKO-TEX®, REACH, CPSIA (where applicable), and buyer-specific requirements should be verified prior to commercial production. Particular attention should be given to curing conditions, adhesive compatibility, heavy-metal restrictions, and wash-care instructions to ensure long-term product performance and consumer safety.
Written by
Alam Mohammad Shafiqul
Lead Editor, Contributor
Textile Technology
Over 15 years of experience in textile engineering, Sweater & tech development. Passionate about bridging the gap between factory-floor practice and technical knowledge.