Sweater Knitting Techniques: Gauges, Yarn Selection and Fashion Applications
37 min read
Knitting is the core operation in sweater manufacturing. It is the stage where yarns are transformed into shaped fabric panels using various knitting machines. Unlike woven apparel, sweater panels are not cut from fabric; they are knitted directly to shape based on the garment’s measurements, gauge and construction.
Sweater Knitting
Knitting is the heart of the entire sweater production process
Before knowing sweater knitting some important terms need to know
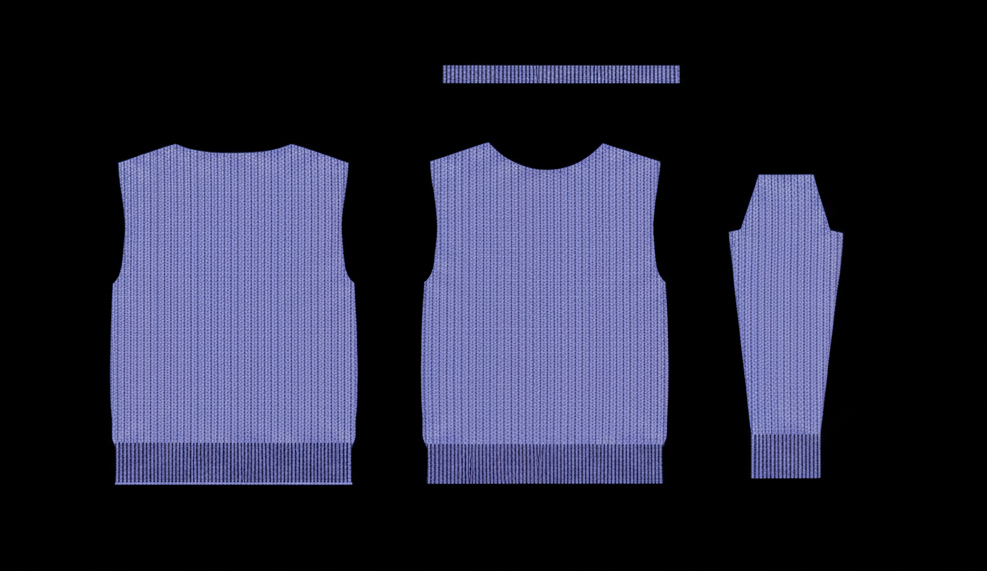
Panel: Sweater knitting involves producing knitted fabric panels and shaping them into garment components such as:
Front body
Back body
Sleeves
Neckline
Ribs, hems and cuffs
These parts may later be assembled (linking/sewing), but the knitting process itself focuses on creating each fabric piece with the correct tension, density, dimensions and pattern.
Sweater Panels
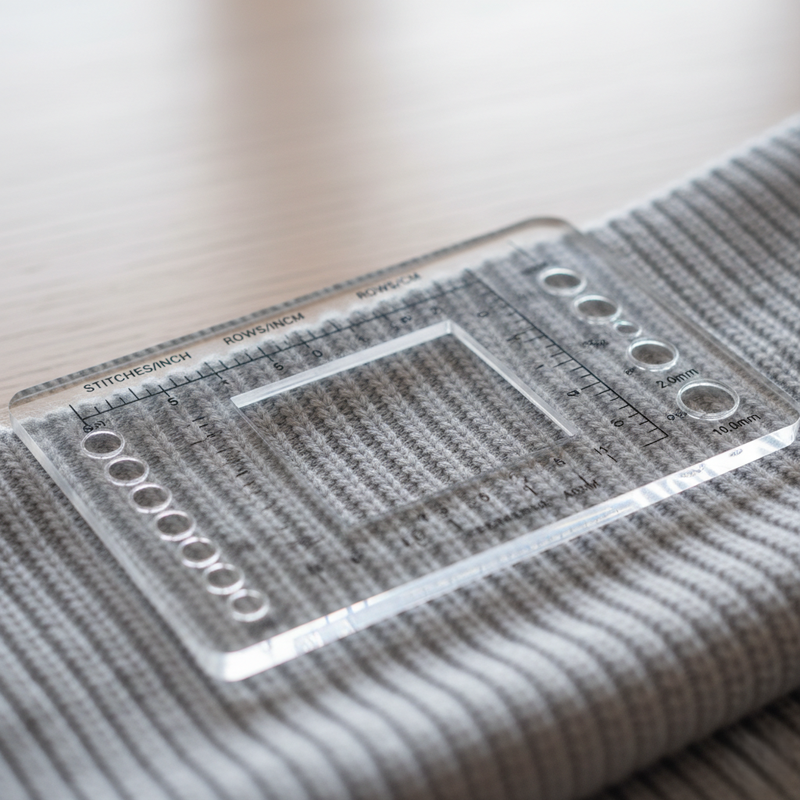
Gauge
Gauge (often written as GG) refers to the number of needles per inch on a knitting machine or the number of wales (vertical loops) per inch produced by that needle bed.
Higher GG → more needles per inch → finer, tighter & lighter fabric
Lower GG → fewer needles per inch → coarser, thicker fabric
Rule of thumb: 3 GG = 3 needle per inch; 7 GG = 7 needles per inch; 12 GG = 12 needles per inch, 1.5GG= 3 Needles per 2 inches.
3GG Sweater12GG Sweater
Light vs Heavy Gauge (as used in sweater industry)
* GSM also depends on stitch length, yarn count, structure (jersey, rib), finishing and relaxation.
Multi Gauge, Convertible Gauge and Hook Gauge
Multi Gauge
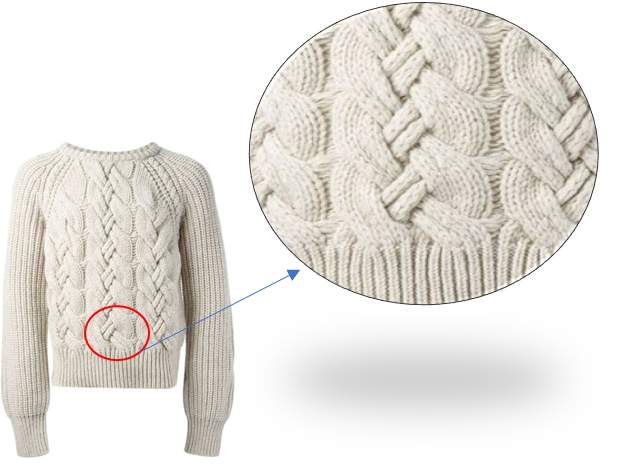
Knitting different gauge effects within one garment part on the same machine, via needle selection, plating, tuck/transfer tricks and stitch length modulation.
Multi Gauge Sweater
Outcome: Textural panels (e.g., chunky cables + fine jersey) without changing machines; decorative variety, complex patterns.
Convertible Gauge
A machine platform designed to operate across a range of gauges—you can practically reconfigure to knit different GG on the same base machine (e.g., by changing needle beds, beds/needles pitch groups or other manufacturer‑specific kits).
Outcome: Not simultaneously in the same course; rather one gauge at a time per setup. Great for flexibility in factory capacity across seasons.
Hook Gauge (for latch needles)
Gauge of the hook of a latch needle—essentially the actual functional machine gauge of a convertible setup.
Hook Gauge
Why it matters: Ensures the yarn size and stitch formation fit the needle hook geometry; influences yarn count window and defect risk (missed latches, dropped stitches).
Match yarn count to hook gauge to ensure good loop formation.
Machine GG
Typical Yarn Counts (metric Nm)
Notes
3 GG
Nm 0.5/1 – 1/1 (very bulky)
Cable stability needs care
5 GG
Nm 1/10 – 1/16
Lofty acrylic/wool blends
7 GG
Nm 1/16 – 2/20
Versatile fashion segment
10–12 GG
Nm 2/20 – 2/46
Core fine sweaters
14–18 GG
Nm 2/48 – 2/80
Delicate, high stitch definition
(Always validate with supplier charts and on‑machine trials.)
At-a-Glance-Gauge
✓ GG up → fabric finer; GG down → fabric chunkier.
✓ Heavy gauge: 0.5–7 GG; Light gauge: 9–18 GG.
✓ Multi gauge: varying density within the same piece via programming.
✓ Convertible gauge: reconfigurable machine for different GG, one at a time.
✓ QC: always base decisions on washed/relaxed swatches.
How Sweater Knitting Is Done
Modern sweater manufacturing is built on the interaction between needles, cams, carriages and yarn feeders. Understanding this mechanism is essential for machine technicians, industrial engineers, merchandisers and designers.
This section expands on your visuals and explains the knitting fundamentals clearly.
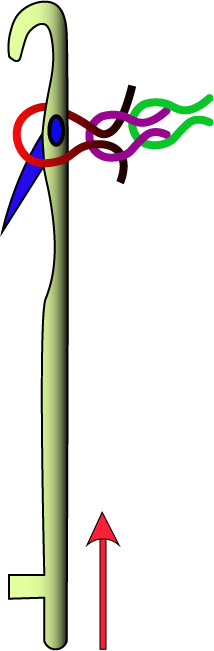
Understanding the Basic Loop Formation Process in Knitting
Knitting is one of the oldest and most versatile forms of textile construction. Knitting is the process of creating fabric by interlocking loops of yarn. Needles are used to create the loops. All knit fabrics from the simplest jersey to the most complex jacquard are made either by hand or by sophisticated computerised flat knitting machines. But the basic principle for all is the same: the formation of loops.This section describes the mechanism of loop formation in a simple, visual and technically correct manner.
Loop in KnittingLoop
A loop or stitch is formed when the needle pulls new yarn through a loop already in place.
Each loop then hooks through the previous one, creating a continuous chain.
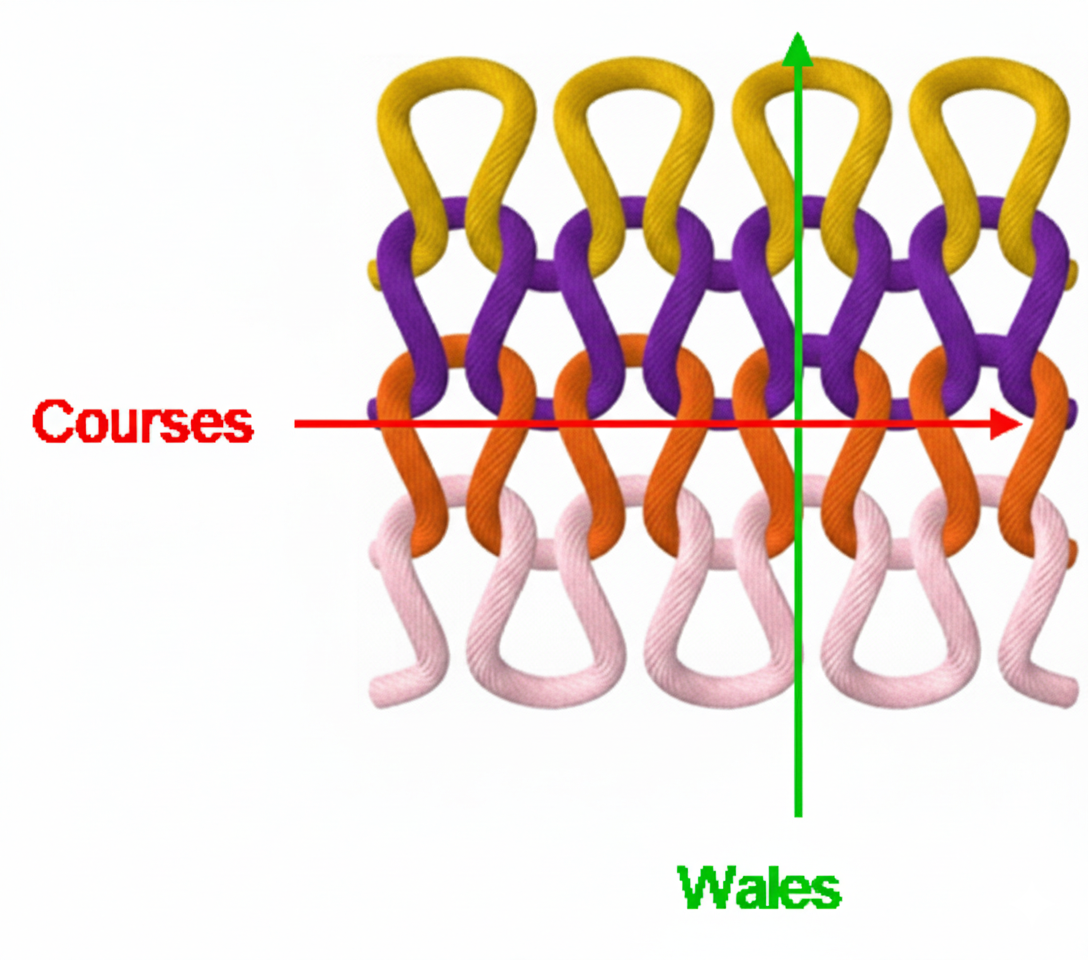
The fabric is built up by stacking rows of loops vertically (wales) and connecting them horizontally (courses).
Courses & Wales
How a Needle Forms a Loop
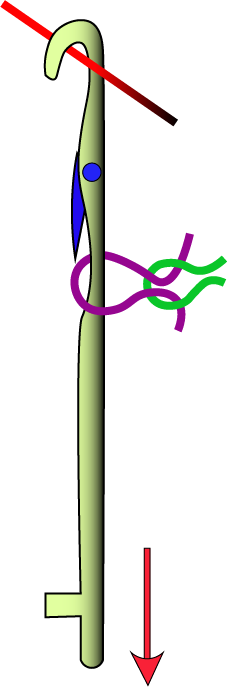
Knitting Actions of a Latch Needle (Step‑by‑Step Explained)
Step by step explanation of knitting actions of a latch needle .
The latch needle is the most common type of needle used in flat, circular, and computerised knitting machines.
The unique feature is the latch, a small hinged flap that opens and closes automatically while you knit to help form loops.
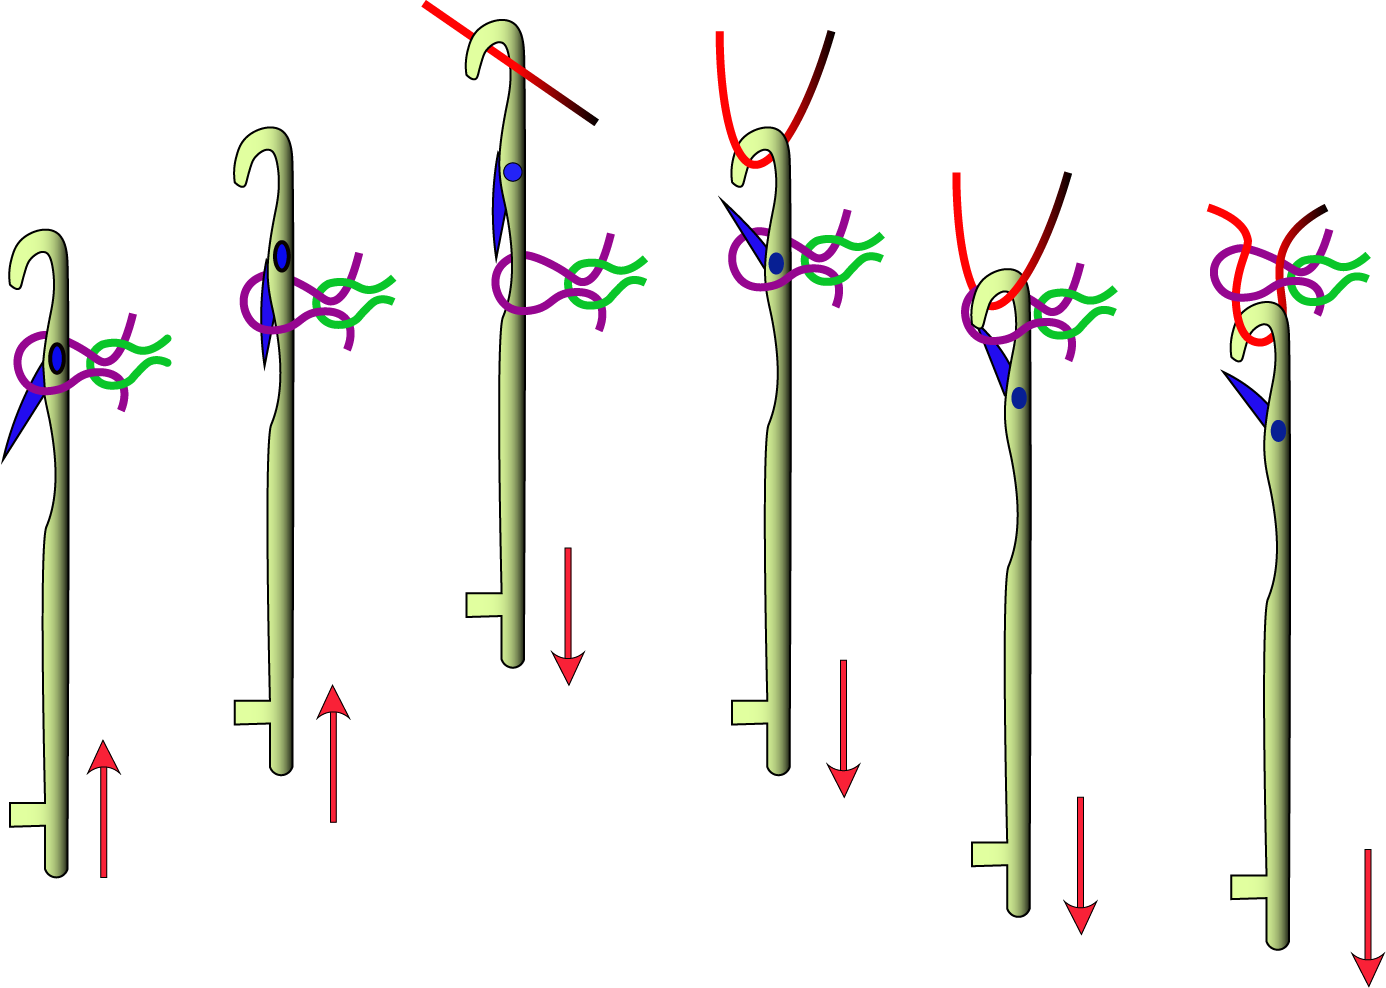
The latch needle performs 4 main actions of knitting.
Knitting Actions of a Latch Needle
Clearing
Feeding
Knocking‑over
Drawing‑down (loop forming)
The image you provided shows these steps visually.
Below is a detailed explanation of the entire cycle.
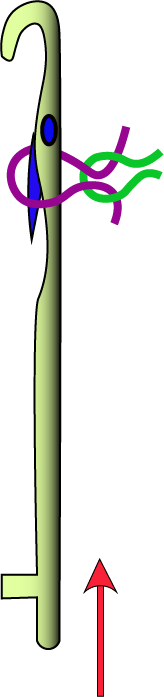
Clearing (Raising the Needle) Clearing (Raising the Needle)
The needle is lifted upward by the CAM.
Key Actions
The existing (old) loop slides down from the hook and rests on the needle stem.
The latch automatically opens as the old loop pushes against it.
The hook becomes completely empty and ready to receive new yarn.
Purpose:
To clear the hook so a new loop can be formed.
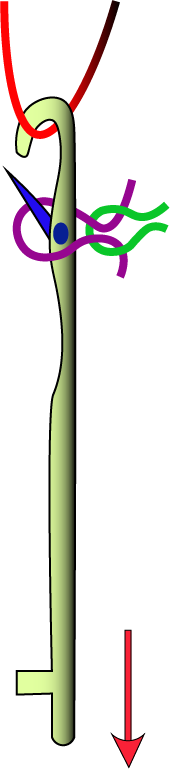
Yarn Feeding (Receiving the New Yarn)Yarn Feeding (Receiving the New Yarn)
As the needle reaches its highest point:
Key Actions
The yarn feeder lays a new yarn strand into the empty hook.
The latch remains open, allowing the yarn to position correctly.
Purpose:
To introduce fresh yarn that will become the next loop.
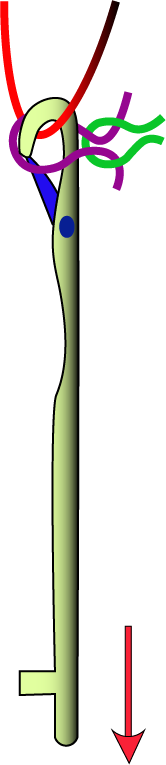
3. Latch Closing (Old Loop Closes the Latch) Latch Closing (Old Loop Closes the Latch)
As the needle begins descending:
Key Actions
The old loop moves upward toward the hook.
It pushes the latch closed.
The latch drops over the new yarn, trapping it inside the hook.
Purpose:
To secure the new yarn inside the hook before knitting begins.
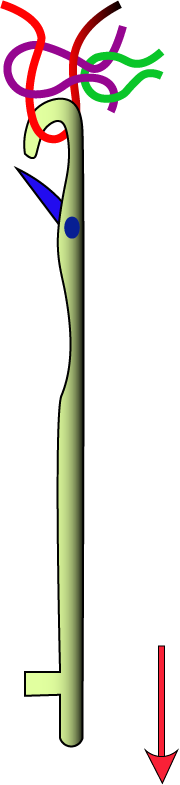
4. Knocking‑Over (Forming the New Loop) Knocking‑Over (Forming the New Loop)
The needle continues moving downward.
Key Actions
The old loop slides over the closed latch and over the new yarn.
The old loop is knocked off the needle, becoming part of the fabric.
The new loop is pulled through the old loop.
Purpose:
To create a new stitch and integrate it into the fabric structure.
The latch opens again as the new loop passes through the hook.
The new loop becomes the old loop for the next knitting cycle.
Take‑down tension pulls the fabric downward to maintain loop size.
Purpose:
To finalize the newly formed loop and prepare for the next cycle.
The needle continues downward, pulling the new loop through the old one.
The old loop slips off the needle, forming part of the fabric.
This cycle repeats continuously as the carriage moves across the needle bed.
Latch Needle Actions
Clearing for new loop
Step
Name
What Happens
1
Clearing
Hook emptied; latch opened; old loop moves to stem
2
Feeding
New yarn placed in the hook
3
Latch Closing
Old loop closes latch over the new yarn
4
Knocking‑Over
Old loop is cast off; new loop is drawn through
5
Drawing‑Down
New loop becomes old loop; fabric pulled down
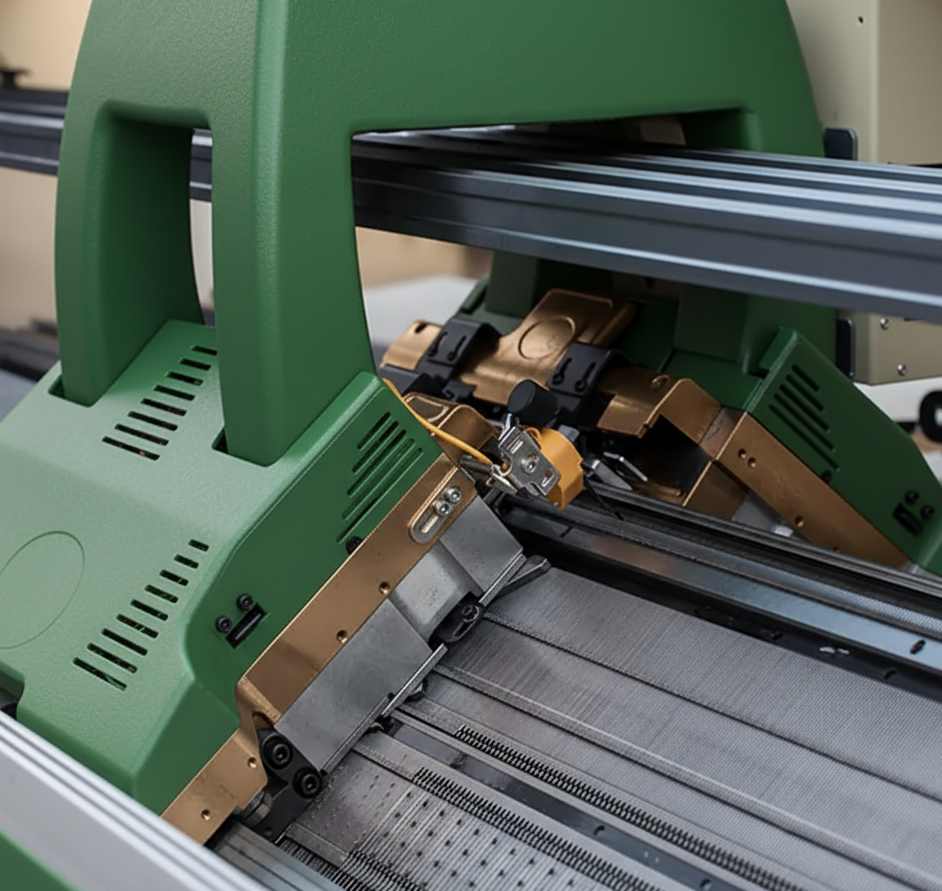
CAMs (Needle Path / Needle Groove)-System
A CAM is the metal path or groove inside the knitting carriage that control what the needle does.
Inside the knitting carriage (or CAM box), the CAM controls:
How the needle moves
Which direction it travels
What kind of stitch gets formed (knit, tuck, miss)
So yeah… small part, big responsibility.
Knitting Carriage or CAM BOX
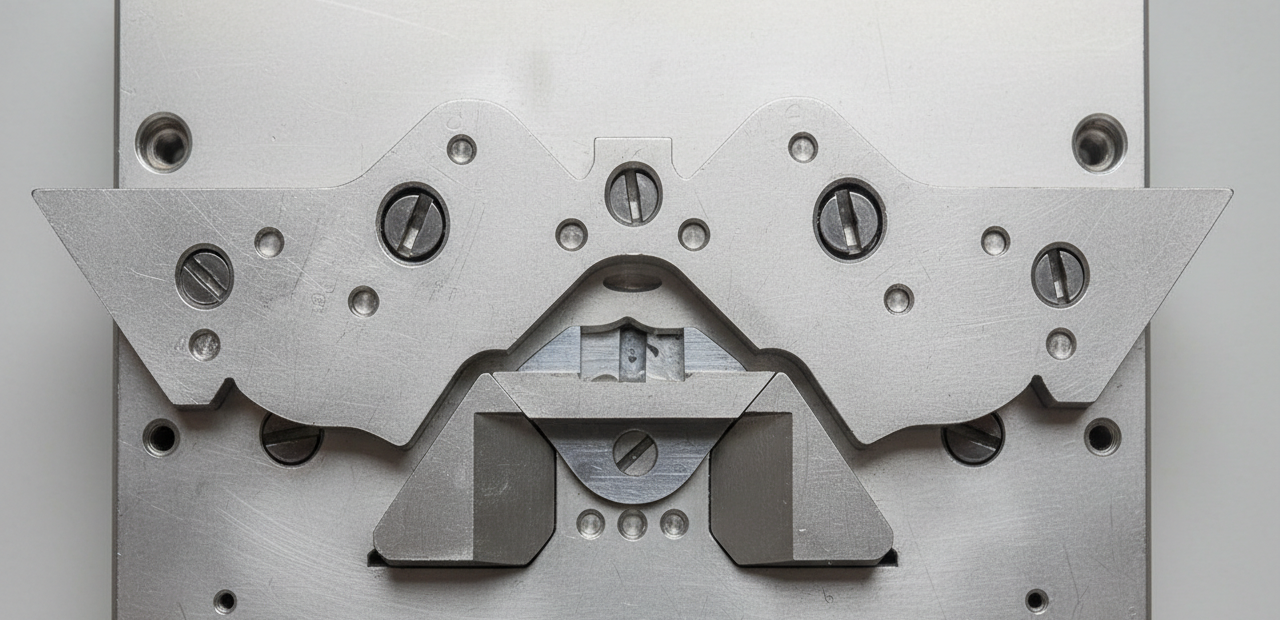
How CAMs Work
As the carriage moves left and right:
✓ Needles slide into CAM grooves
✓ CAM shape forces the needle up/down
✓ This movement forms the stitch
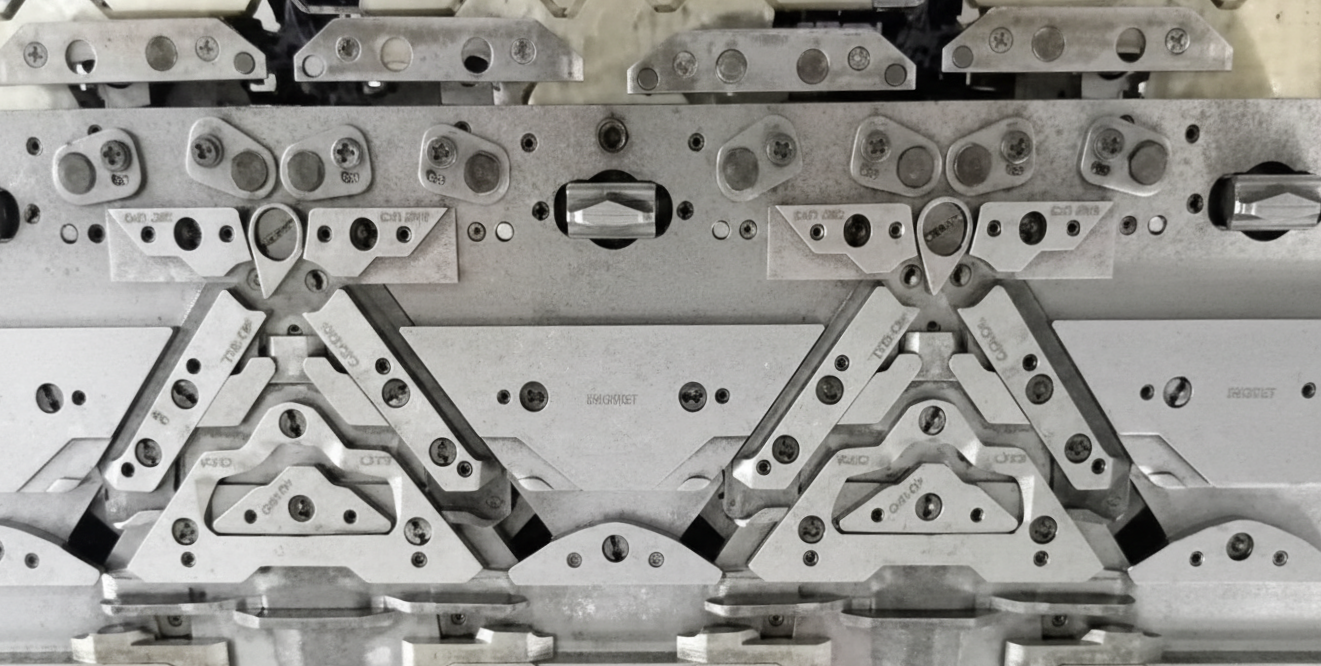
Why CAM Count Determines “System”
Needle path/groove in which needle goes through is called CAM. If machine has one CAM, then it is called 1 System machine.”
1 CAM or 1 System
2 System or 2 CAM
Quick Breakdown
1 System (1 CAM)
→ About ½ course per carriage movement (left to right)
→ Slower, but simpler
2 System (2 CAMS)
→ 1 full course per movement
→ Balanced speed and control
3 System (3 CAMS)
→ Around 1.5 courses per movement
→ Faster output
More systems
→ More knitting actions per pass
→ Higher productivity
And in some machines—especially double carriage setups—you can have multiple systems working together. Things can scale up pretty quickly.
Types of Sweater Knitting Machines
The modern Sweater manufacturing sector utilizes a varied selection of knitting machines, each tailored to specific gauge needs, fabric designs, and production flexibility and efficiency results. Planners, technicians and industrial engineers responsible for costing, capacity planning and quality assurance must understand the type, system configuration, gauge capability and brand specialization.
This guide covers:
Core machine categories
Machine systems (1‑bed, 2‑bed, 4‑bed)
Stoll machine catalog
Shima Seiki machine catalog
Chinese machine category overview
Practical implications for production, IE and costing
Main Types of Sweater Knitting Machines
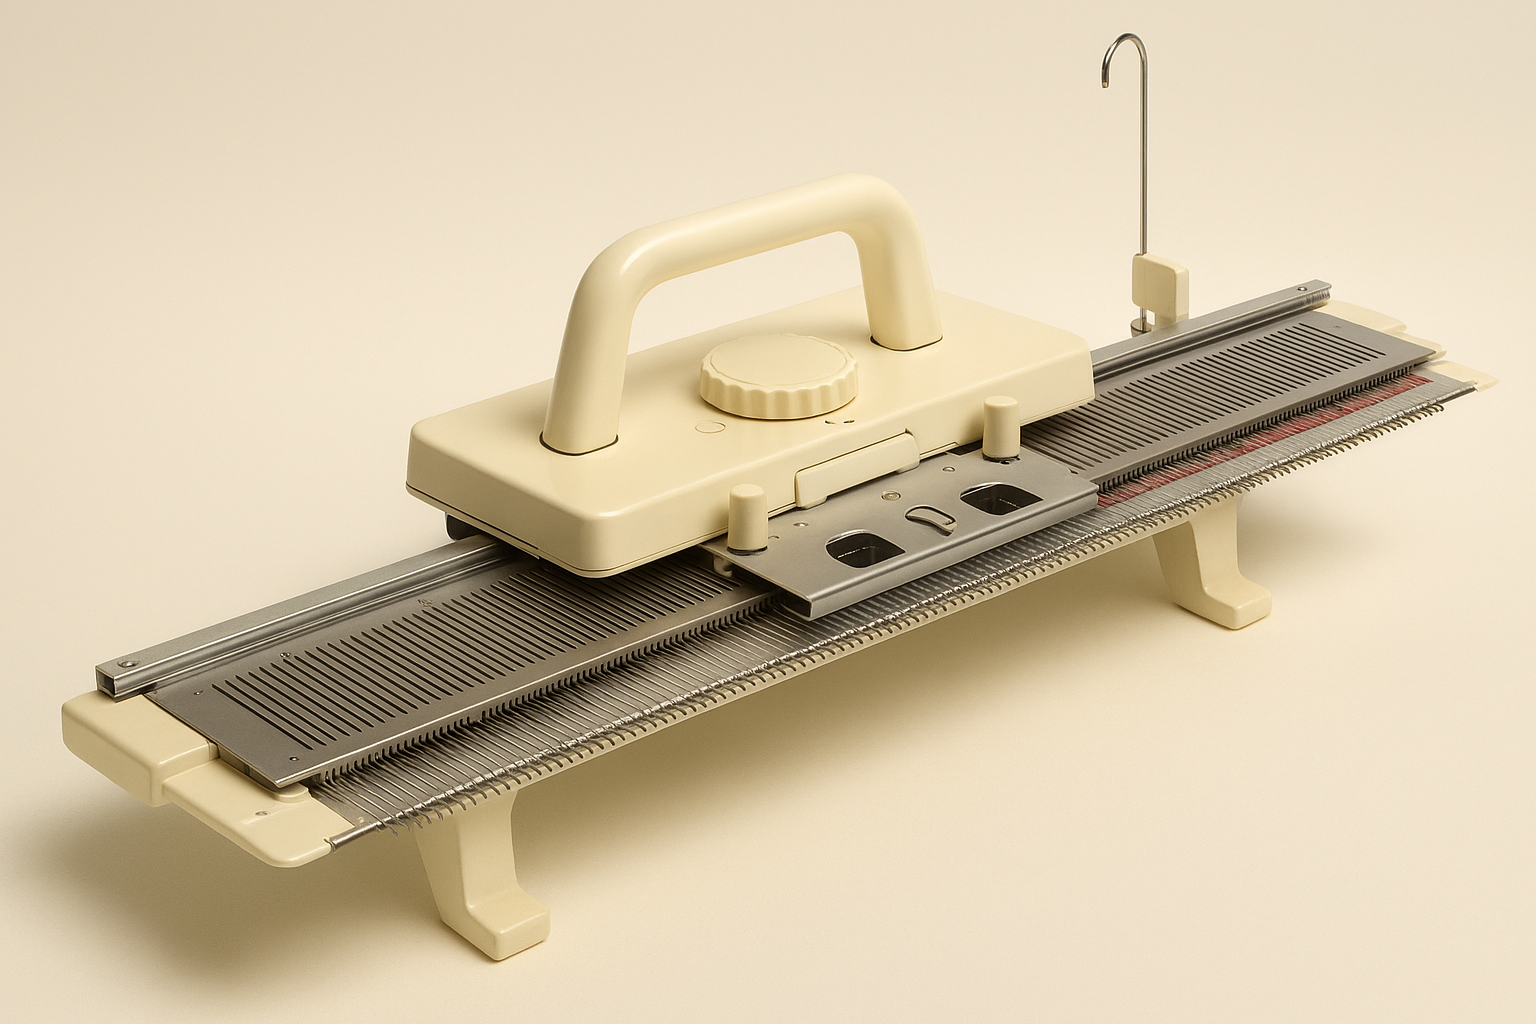
Manual Knitting Machines (Fixed Gauge)
These are traditional hand-operated flatbed knitting machines, used mainly for sampling, prototyping, repair and small-scale production.
Suitable for basic sweater panels, ribs, cables and regular structures.
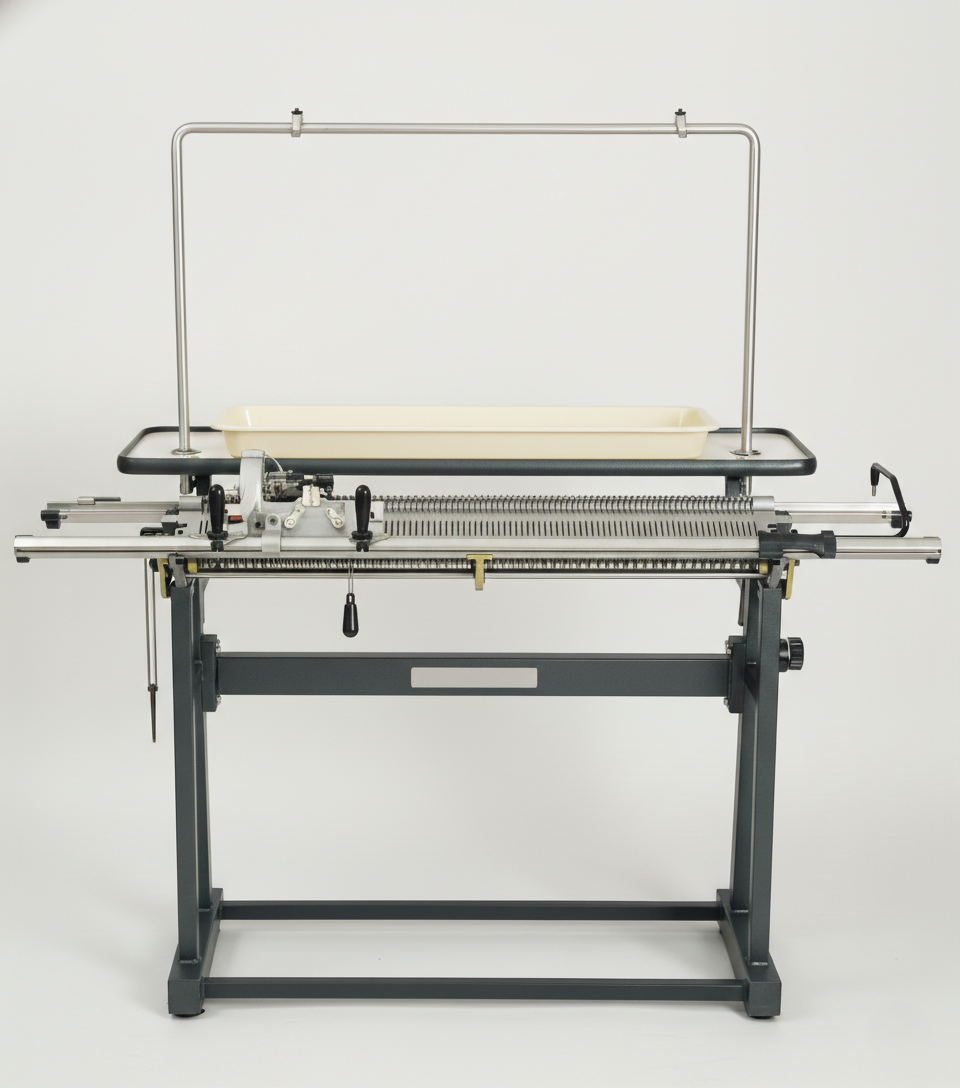
Semi-Automatic Flat Knitting Machines
Best Use: Low-cost sweater production, emerging factories, training centers.
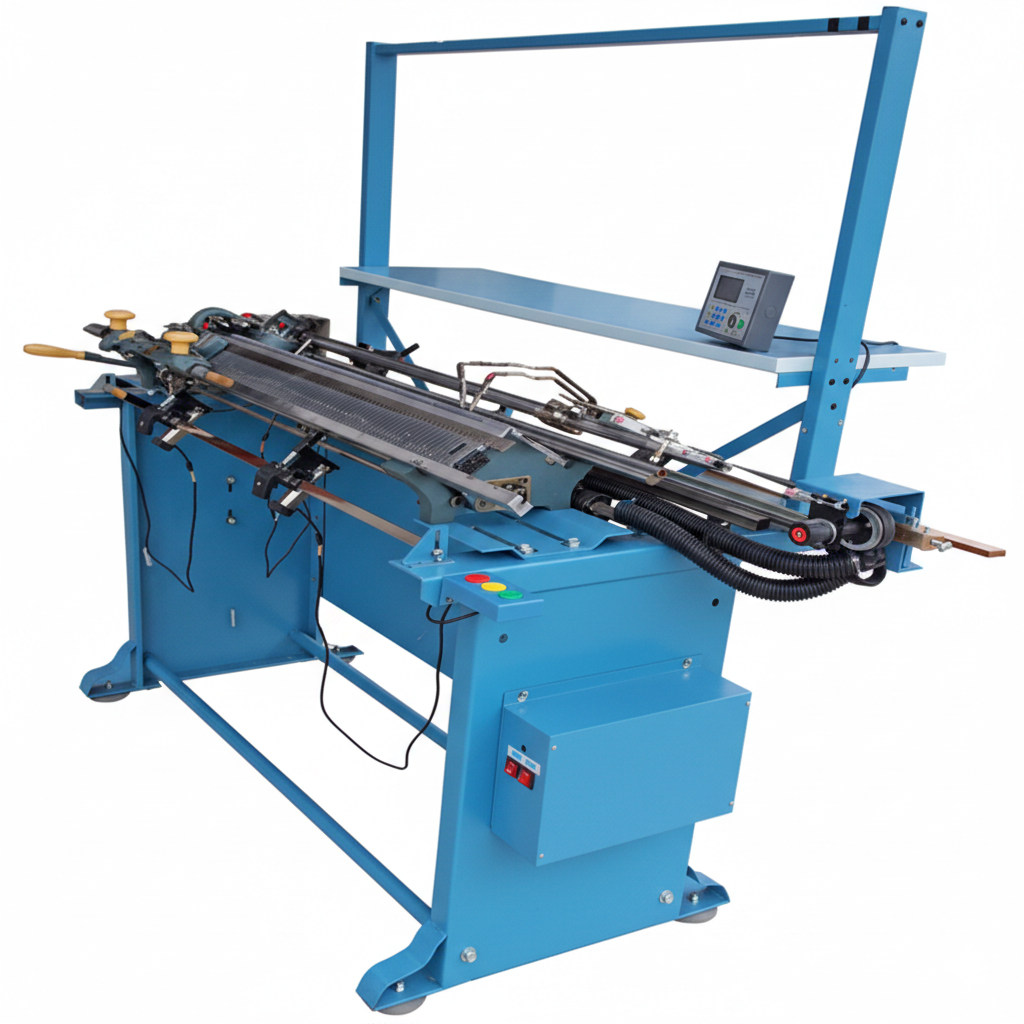
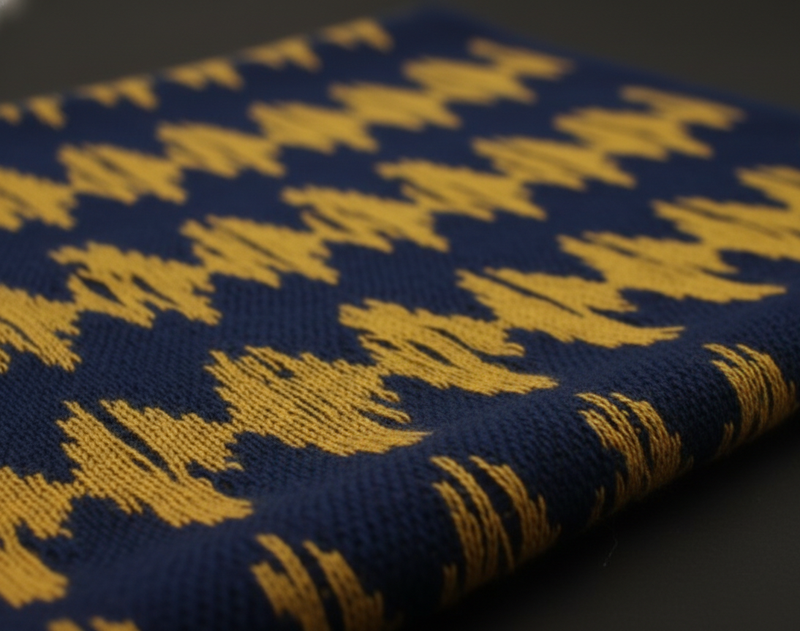
Fully Automated Jacquard Knitting Machines (Fixed, Multi & Convertible Gauge)
Jacquard machines are sophisticated computer-controlled flat knitting machines, able to create complex patterns, intarsia, plating, variable gauge designs and fine-quality knitwear.
Available Types
1 System (Chinese) – Basic full-automatic, low-cost entry model
2 System (China, Germany, Japan) – Most commonly used in mass production
3 System (Germany, Japan) – Higher efficiency, ideal for fine structures
4 System – Double Carriage (Germany, Japan) – Two carriages work together for high output
2 System – Double Carriage (Germany, Japan) – Flexible and balanced for large orders
4 Bed – Seamless Whole Garment Machines (Japan) – Advanced 3D knitting without seams
Why “Systems” Matter?
A “system” represents a knitting head that can work independently.
1 System = 1 CAM (1/2 course knitting per movement (Left to right)
2 System = 2 CAMS (1 course knitting per movement (Left to right)
3 System = 3 CAMS (1.5 course knitting per movement (Left to right)
More systems = more carriage activity per course = higher production efficiency.
4-system machines can double production on selective patterns.
Stoll Machine Categories (Germany)
Stoll is known for precision engineering, reliability and advanced knitting technology.
Key Machine Features
Fixed, multi-gauge & convertible platforms
Wide gauge range (3.5 GG to 21 GG depending on model)
Renowned for intarsia, plating, 3D knitconstruction
Advanced programming via M1 design system
Stoll jacquard machine
Popular Stoll Convertible & Multi-Gauge Series
Model
Gauge Range
Hook Gauge
Stoll 2.5_2
2.5 GG × 2 = 5 GG
Hook GG‑3
Stoll 3.5_2
3.5 GG × 2 = 7 GG
Hook GG‑5
Stoll 7_2
7 GG × 2 = 14 GG
Hook GG‑10
Stoll 6_2
6 GG × 2 = 12 GG
Hook GG‑8
Stoll 8_2
8 GG × 2 = 16 GG
Hook GG‑12
Stoll 9_2
9 GG × 2 = 18 GG
Hook GG‑14
Stoll Key Models and Features
Model 502 (2 System – 48"/52")
Jacquard; intarsia feeder optional
Model 530 (3 System – 48"/52")
Jacquard with plating options
Model 330 (3 System –36")
Jacquard with plating options
Model 730 (3 System – 72")
Suitable for intarsia + plating structures
Model 822 (4 System – 84")
Jacquard; 2‑carriage; capable of knitting two parts simultaneously
Model 830 (2 or 3 system – 84")
High-output plating and jacquard operations
Stoll machines are widely used for fine to mid-gauge commercial knitwear, engineered fashion structures and high-quality export production.
Shima Seiki Machine Category (Japan)
Shima Seiki is a global leader in advanced flat knitting technology. They pioneered WHOLEGARMENT seamless knitting and are known for consistency, precision and reliability.
Key Machine Features
Fixed, multi-gauge & convertible platforms
Wide gauge range (3.5 GG to 21 GG depending on model)
Renowned for intarsia, plating, 3D knit and WHOLEGARMENT construction
Advanced programming via SDS-ONE APEX design system
Shima Seiki Japanese Knitting Machine
Popular Shima Seiki Models
Standard Flatbed Models
MACH2SIR‑123 – 2 system, 12/14/16GG
SSR‑112 – 2 system, 7/12/14/16GG
SIR‑123 – 2 system, 3.5GG, 5GG, 7GG
High-Capacity / Multi-System Models
N.SVR‑123SP – 2 system, plating-focused
SVR‑122SP – 2 system, 5–7–12–14–16GG
SCG‑122SN – 3 system, 3/4/5GG
Double Carriage Models
SFF‑1527 – 2 system, 2-carriage, 7–18GG
Enables two panels to be knitted at once → higher throughput
Key Advantage:
Shima machines are unmatched for seamless sweaters, eliminating linking operations and reducing production time drastically.
Chinese Machine Category
Chinese flat knitting machines offer cost-effective production solutions. Although traditionally built with fixed gauge, newer models include convertible configurations.
1 System – Fixed Gauge
Roller/comb feeding system
2 System – Fixed Gauge
Suitable for mid-level production
2 System – Convertible Gauge
Increasingly used for versatile, budget-friendly knitting
CIxing knitting machine -CX2-52C-U
Typical Advantages
✓ Very economical
✓ Easy maintenance
✓ Ideal for bulk orders, basic styles and price-sensitive markets
Machine Type Comparison
Category
Gauge Type
Productivity
Best For
Manual
Fixed
Low
Sampling, hand textures
Semi-auto
Fixed
Low–Medium
Low-cost production
Jacquard Auto
Fixed/Multi/Convertible
Medium–High
Export knitwear
Stoll
Fixed/Convertible
High
Complex structures, premium knits
Shima Seiki
Fixed/Multi/WholeGarment
Very High
Seamless knits, engineered fashion
Chinese
Fixed/Convertible
Medium
Cost-driven bulk production
This expanded guide provides a complete overview of the major categories of sweater knitting machines and their technical capabilities:
✓ Manual & Semi-auto for basic operations
✓ Jacquard Flat Machines for commercial mass production
✓ Stoll & Shima Seiki as global leaders in advanced, multi-gauge and WholeGarment knitting
✓ Chinese machines as cost-effective solutions for basic bulk production
Each machine type plays a unique role in productivity, cost and fashion capability—making it essential to match machine type, gauge, yarn count and design for optimal manufacturing outcomes.
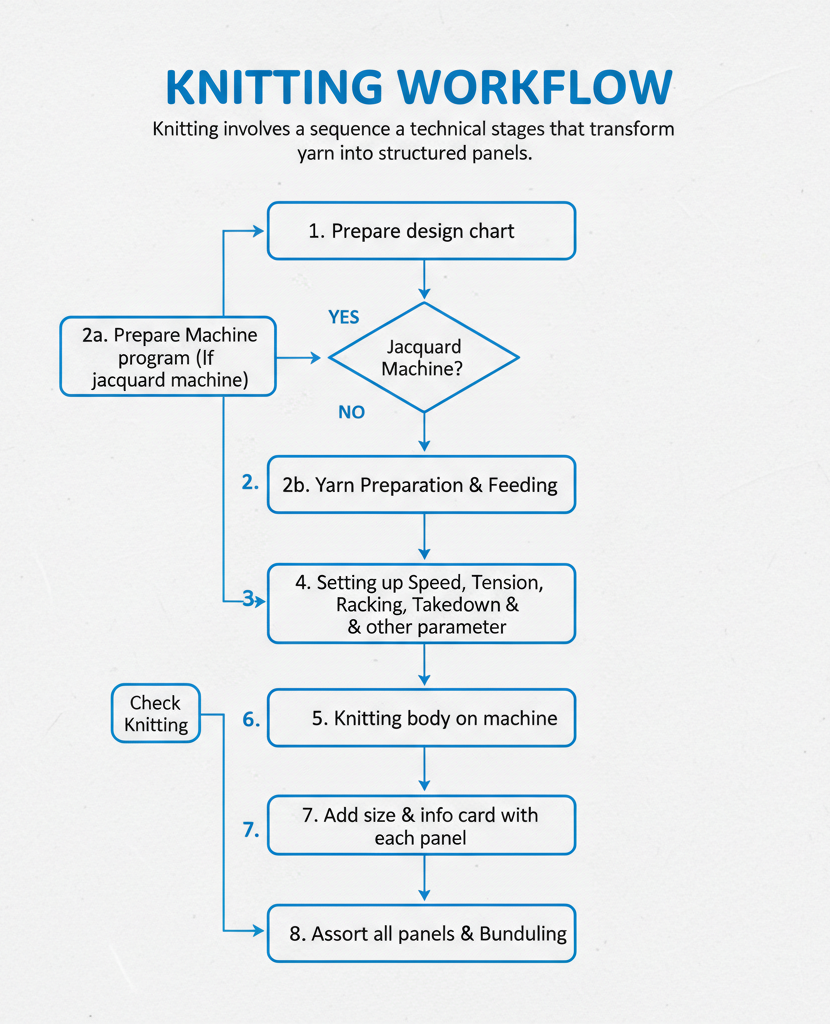
Knitting Workflow
Knitting involves a sequence of technical stages that transform yarn into structured panels.
Prepare design chart
Prepare Machine program(If jacquard machine)
Yarn Preparation & Feeding
Program input on machine
Setting up Speed, Tension, Racking, Takedown & other parameter
Knitting body panel
Check During Knitting
Dispatch from machine & trim
Add size & info card with each panel
Assort all panels & Bundling
Sweater Knitting Workflow
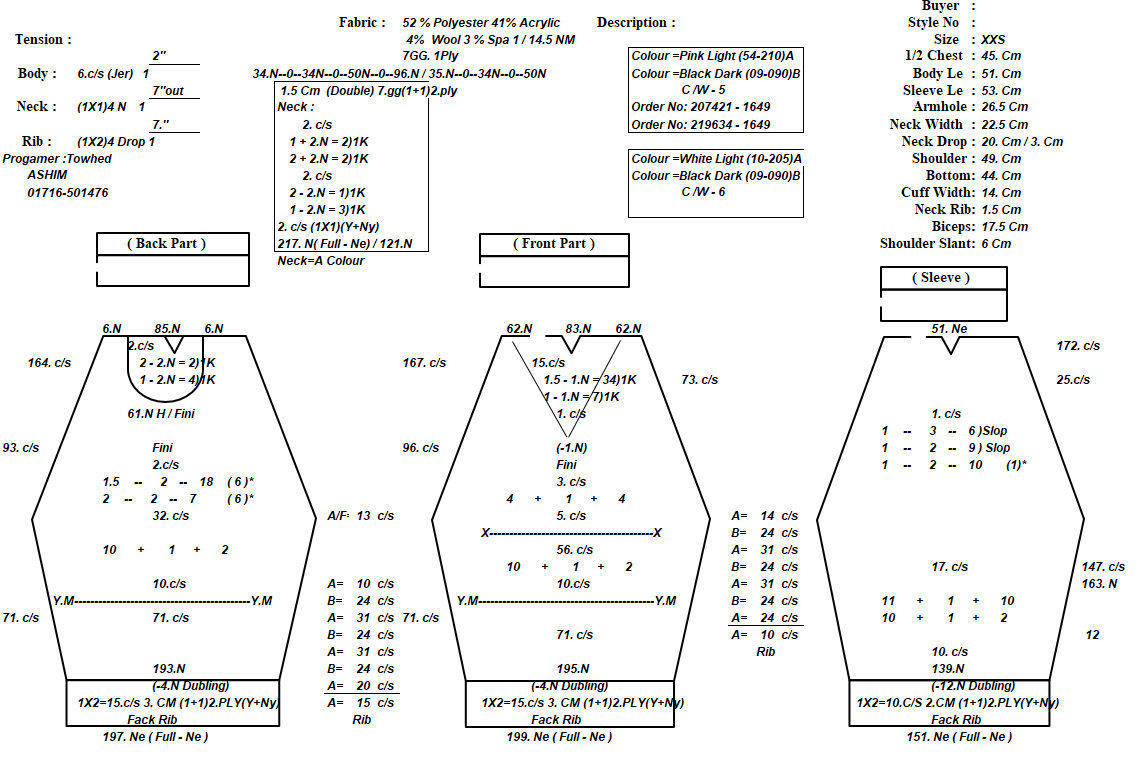
Prepare design chart:
One of the most important technical documents in Sweate knitting is the Design Chart. Detailed guidance on stitch structures, panel measurements, shaping, machine settings and yarn use are given. The chart is the manual and computerised flat knitting blueprint.
Creating an accurate design chart ensures consistent production with correct panel dimensions and high-quality knitted pieces to buyer specifications.
Sweater Knitting Design Chart
Preparing Machine Program from Design Chart Using M1, APEXFiz & HQPDS (Jacquard Machine)
The preparation of a machine program is an important step in converting a design chart to a knit ready digital file for a computer controlled flat knitting machine (e.g. Shima Seiki, Stoll, Cixing).
Software such as M1 Plus, APEXFiz and HQPDS help translate stitch structures, shaping and jacquard patterns into machine-operational code.
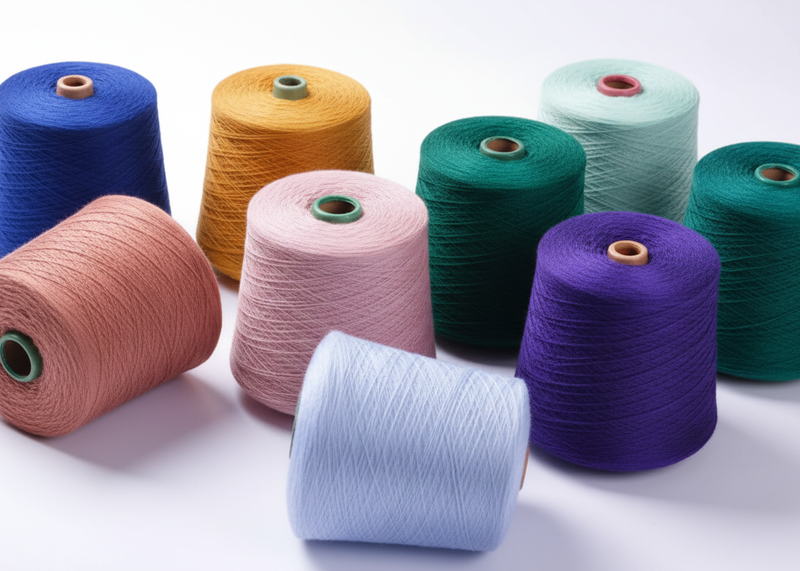
Yarn Preparation & Feeding System
Before the machine even starts knitting, a lot is already happening. Quiet setup work—but it matters.
First, the yarn cones go onto the creels. Sounds basic, but placement matters. A badly placed cone can pull unevenly, create sudden tension spikes… and once that starts, it’s hard to control downstream.
Then comes tension setting. This isn’t one-size-fits-all.
Each yarn behaves differently—count, elasticity, composition, even finish. So operators tweak the tensioners to match the yarn and the machine gauge. Too tight? Yarn stress. Too loose? messy loops.
Next, the feeding path gets checked. Properly.
No knots. No tangling. No rough guides. The yarn should run clean and smooth from cone to feeder. If it snags now, you’ll see defects later.
Why Tension Control Is a Big Deal
Even tiny variations mess things up.
Uneven stitches
Panel size drifting out of spec
Yarn breaks mid-run
Surface that just doesn’t look right
Good tension = stable fabric.
And stable fabric means your measurements actually match what’s in the tech pack.
Programming Inputs (for computerized machines)
Once setup is good, the machine needs instructions.
For machines like Shima Seiki or Stoll, everything runs on programs. You load the file—and that file basically tells the machine how to “think.”
Typical inputs include:
Panel shape file→ Controls full-fashion shaping and dimensions
Jacquard / Intarsia patterns→ Decides color placement and feeder usage
Cable instructions→ Needle transfers for texture
Cast-on / Bind-off setup→ Based on edge requirement
Yarn feeder sequence→ Which feeder comes in, when, and where
If the program is wrong—even slightly—you won’t just get defects. You’ll get a completely wrong panel.
Knitting Panel
Once everything is anchored, knitting begins. This is where the machine really gets to work.
But it’s not just repetitive motion—there’s a lot going on during the run:
Functional Controls in Action
Stitch density (DS) changes: Different areas can have different densities. Subtle but important.
Mitering (neck / shoulder shaping): Controlled increases and decreases to form contours
Tuck / Miss stitches: Used for texture, looseness, or pattern effects
Needle transfers: For shaping and cable development
Racking movement: Bed shifting for cables and decorative structures
All these controls together give you the final look—and fit. Not just “fabric,” but engineered fabric.
Cast-On Process
Cast‑on is the foundation row that anchors the panel.
A stable cast-on ensures:
Accurate panel width
Smooth edges
No curling or distortion
Strong anchoring for subsequent rows
cast-on
Common Cast-On Methods
Tight cast-on→ Ribs, cuffs, waistbands
Loose cast-on→ Soft, drapey fabrics
Tubular cast-on→ Premium rib finish
Waste yarn cast-on→ Useful when panels need linking or trimming later
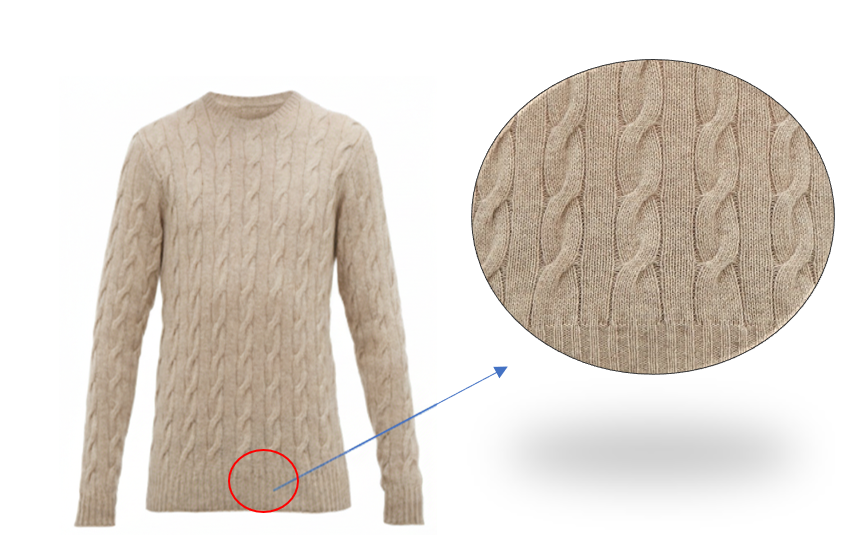
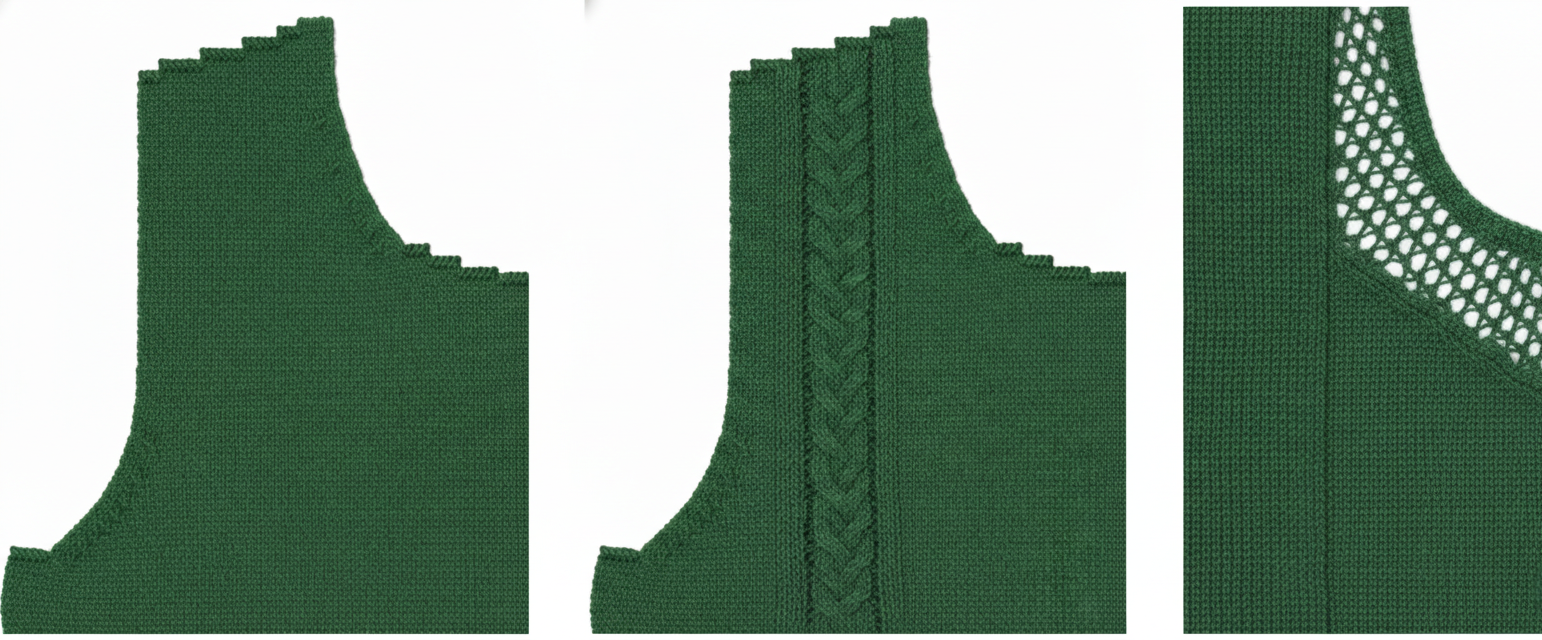
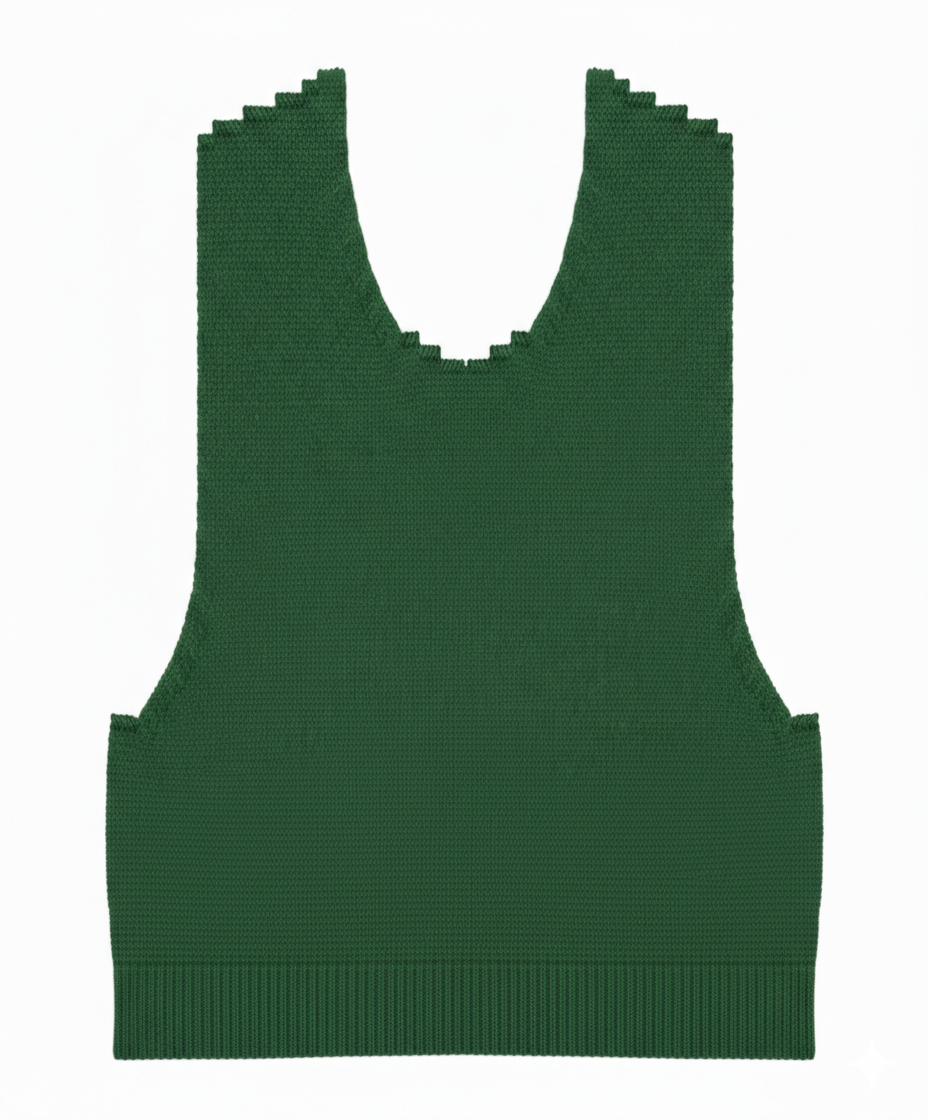
Panel Shaping (Full Fashioning)
This is one of the defining parts of sweater knitting.
Unlike cut-and-sew, here you’re shaping the garment on the machine itself. No cutting afterward.
Knitted sweater part
Why Full Fashioning Matters
Better fit
Less waste
Cleaner look
Stronger edges
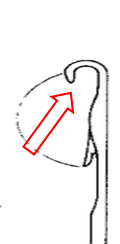
And those diagonal lines you sometimes see on the edges?
Those are fashion marks. Not defects—actually a sign of quality.
Full Fashioning
Typical shaping areas:
Armhole
Shoulder slope
Neckline
Sleeve crown
Full-fashioning ensures each panel is ready for assembly with minimal trimming.
Why Shaping Matters
Provides correct fit
Reduces wastage (no cutting)
Ensures smooth armhole, neckline and shoulder curves
Panel Shaping Methods
a) Increasing
Adding loops to expand width
→ sleeves, chest, hip area
b) Decreasing
Reducing loops for taper
→ armholes, neckline, shoulders
c) Fully Fashioned Edges
Visible fashion marks from loop transfers
→ considered premium
Cast-Off Process
At the end of knitting, loops need to be secured. Otherwise… the whole thing can unravel.
Types of Cast-Off
Normal
Loose (for soft edges like necklines)
Tubular (premium finish)
Waste yarn (for linking processes)
A clean cast-off = clean finishing later.
Cutting, Folding & Bundling of Panels
After knitting:
✓ Panels are manually trimmed
✓ Attach size tag or card to each panel.
Include panel details such as: Style number, Size, Color, Machine number, Operator name, Production date
✓ Checked against measurement specs
✓ Sorted by size and color
✓ Bundled for mending and linking
Panels move to the next process only after inspection.
Checking During Knitting
Quality checks occur at multiple points:
Yarn Breakage Monitoring
Automatic stop sensors detect:
Yarn breaks
Low yarn tension
Knot entanglements
Panel Measurement Check
Operators measure:
Width
Length
Armhole depth
Neckline depth
Measurements must match pre-wash specifications.
Surface Defect Detection
Common issues checked:
Holes
Needle lines
Barre(color streaks)
Dropped stitches
Wrong jacquard color feed
Early detection prevents rework.
Conclusion
At the end of the day, knitting really is the heart of sweater production. Everything else—linking, finishing, packing—comes later. But if the knitting isn’t right, nothing else can fix it.
It all starts with panels. Simple idea, but a lot goes into getting those panels correct. Front, back, sleeves, neckline, ribs… each one has to come off the machine with the right shape, the right measurements, and consistent fabric quality. No guesswork.
Then comes gauge—and this is where things quietly make or break a sweater.
A small change in GG shifts everything: fabric thickness, yarn choice, handfeel, even how the garment looks on the body. Chunky 3GG? Bold, heavy, textured. Fine 12GG? Clean and refined. Same sweater concept, completely different outcome.
And it doesn’t stop there.
You’ve got multi gauge for design variation, convertible gauge for production flexibility, and hook gauge sitting in the background making sure yarn and needle actually get along. Easy to overlook—but ignore it, and defects show up fast.
Then comes the machine itself. Needles moving. CAMs guiding. Carriage sliding back and forth.
Loop after loop. Quiet repetition—but highly controlled. Every stitch is the result of a precise sequence: clearing, feeding, closing, knocking-over, drawing-down. Miss a step, and the fabric tells on you immediately.
And behind all that? Programming, yarn feeding, tension control, shaping…
All connected. Nothing works in isolation.
Good knitting is never just one thing done right.
It’s a chain of small decisions—set correctly, one after another.
From an IE or production point of view, it all ties back to a few key outcomes:
Consistent panel dimensions
Controlled yarn usage
Minimum rejection
Stable cycle time
Get those right, and production flows.
Get them wrong… and problems stack up quickly.
So yeah—knitting might look repetitive from the outside.
But inside, it’s a mix of engineering, precision, and a bit of experience you only get on the floor.
And that’s exactly why it matters so much.
References & Sources
Ray, S.C. – Fundamentals and Advances in Knitting Technology.
Araujo, M. & Castro, E.M.M. – Manual of Knitting Technology.
Munden, D.L. – Research on knitted fabric geometry, loop formation, and dimensional properties of knitted fabrics.
W. E. Morton & J. W. S. Hearle – Physical Properties of Textile Fibres.
Disclaimer: The information provided is intended for educational and industry reference purposes only. Knitting methods, machine specifications, gauge classifications, yarn count recommendations, machine settings, production parameters, and productivity data may vary depending on machine manufacturer, software version, yarn characteristics, knitting structure, factory practices, and product requirements. All technical parameters should be verified through machine trials, supplier recommendations, and production sampling before commercial manufacturing.
Written by
Alam Mohammad Shafiqul
Lead Editor, Contributor
Textile Technology
Over 15 years of experience in textile engineering, Sweater & tech development. Passionate about bridging the gap between factory-floor practice and technical knowledge.